Description:
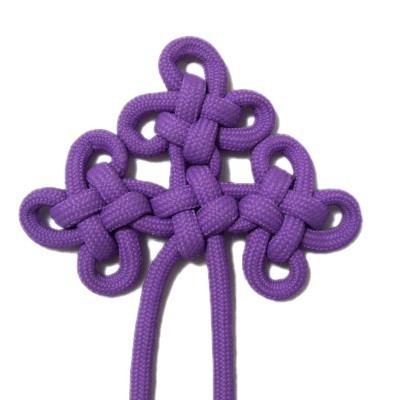
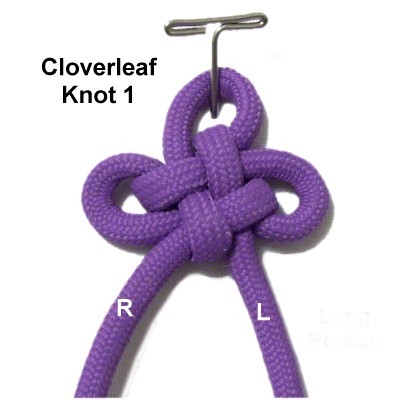
The Ju-i Knot is a unique combination of four
Chinese Cloverleaf knots arranged in an arrow
formation. One knot is vertical, two are
turned sideways, and the last one rests between
the other three.
The design resembles a ceremonial scepter with
scalloped edges. In Chinese folklore
the name means "your heart's desire" and
symbolizes power and good fortune. It's
frequently used in jewelry designs and along the
edges of other projects.
This knot is challenging to tighten, so try to
make the four Cloverleaf knots as small as
possible. In the images, the knots were made
larger than usual so you can see the details
better.
These instructions are different than what you
find on the Cloverleaf Knot
page. The end result is the same, so use the
technique you are most comfortable with.
Here is the key
to the images and instructions:
BIGHTS = Folded segments (labeled 1 - 3)
LOOPS = Circular with crossing point
(labeled A - C)
ARROWS = Show direction and angle
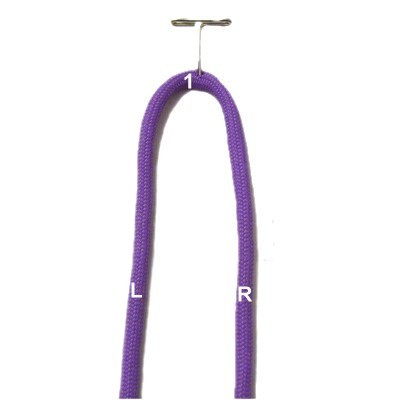
Step
1: To practice the Ju-i
Knot, you need one cord at least 60 inches
long.
Fold the cord in half and secure it
vertically to your board. Mentally
label it as bight
1.
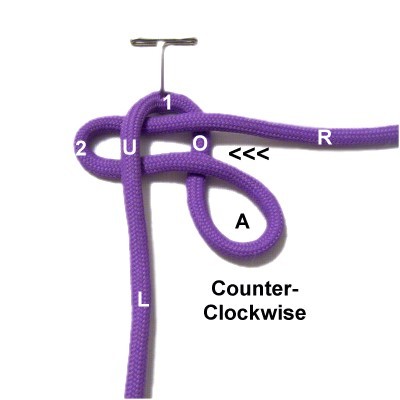
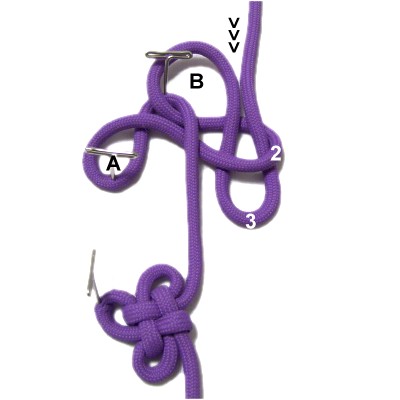
Rotate the righthalf
of the cord counter-clockwiseto
form loop A.
Fold it to create bight
2.
Move it left and pass it into bight 1 over
- under, arranged horizontally.
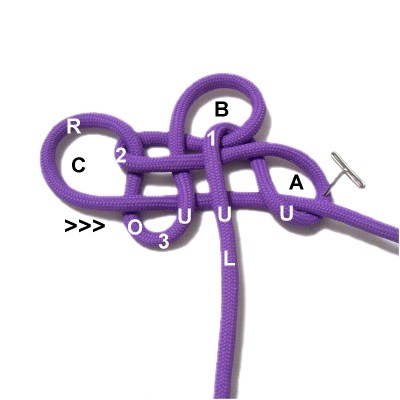
Rotate the righthalf
of the cord counter-clockwise to
form loop
B.
Fold it to create bight
3.
Move it forward and pass it into bight 2 over
- under, arranged vertically.
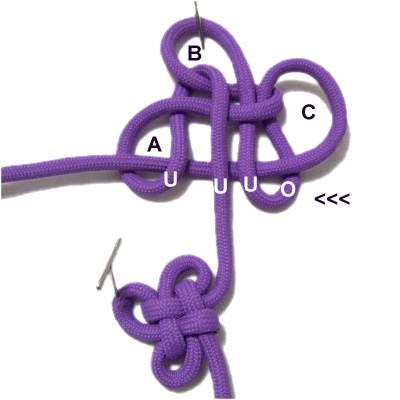
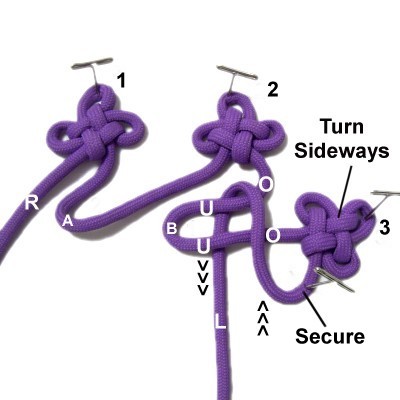
Step
2: Rotate the righthalf
of the cord counter-clockwise
to form loop
C.
Move it through bight
3over
- under, heading right.
Pass it under
the left half of the cord and under
the left side of loop A.
Move the righthalf
to the left, passing it over
the left side of loop A and over
the left half of the cord.
Bring it through bight
3under
- over.
Tighten the
first Cloverleaf for the Ju-i Knot by
pulling on all three loops first, which
will tighten the center area (bights).
Then reduce the size of each loop in the
order they were constructed (A, B,
C).
Step
3: Turn the first knot
sideways, so the left
half
is heading vertically toward the back of
the board (backward).
Start the next Cloverleaf knot by folding
it to the left to form bight
1.
Rotate the
left portion clockwise
to form loop
A.
Fold it to form bight
2.
Pass it into bight 1 over
- under, heading right
horizontally.
Important:Make sure the segment between the
two knots remains straight and is not
kinked.
Rotate the left halfclockwise
to form loop
B, then fold it to form bight
3.
Pass bight 3 into bight 2 over
- under, heading forward
vertically.
Step
4: Create the third clockwise
loop with the left
half of the cord.
Move it over
- under bight 3, heading
left. Pass it under
the segment between the two knots, and under
the right side of loop
A.
Move the left half
to the right, passing over
loop A, over
the segment between the two knots, and
through bight 3 under
- over.
When you tighten this Cloverleaf Knot,
make sure the segment between the two
knots is around 2 inches.
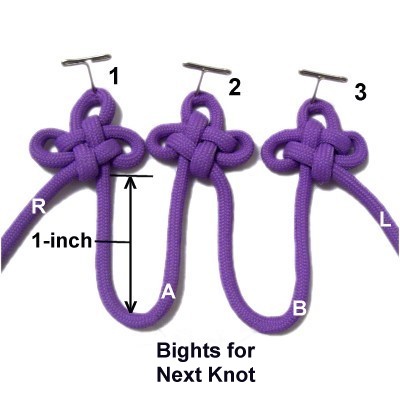
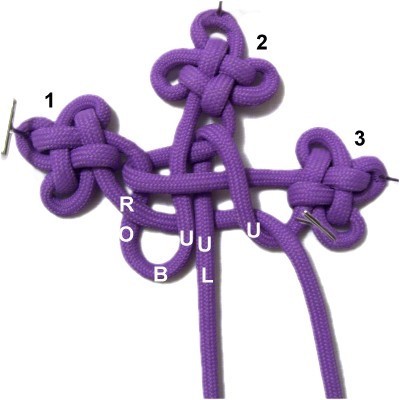
Step
5:Repeat
steps 3 and 4 to create the third
Cloverleaf for the Ju-i Knot.
The 2-inch segments between the knots will
fold to form two 1-inch bights for the
fourth knot. Make sure they are not
kinked or twisted.
Mentally number them A and B as shown.
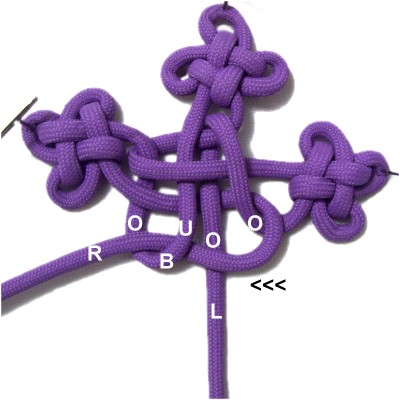
Step
6: Turn the third
Cloverleaf knot sideways, so bight
B is horizontal.
Bring the left
half of the cord over
bight B vertically, heading
backward. Then bring it forward, passing under
bight B.
Secured the curved segment next to knot 3.
Turn the first
Cloverleaf sideways. Curve bight A
forward, then slide it into bight
Bover
- under.
It should be arranged vertically and rest
to the left of the left
half of the cord.
Step
7: Move the right
half of the cord to the right,
passing it over
- under bight B, and under
the left half of the cord.
Move it under
the secured segment next to the third knot
(curved portion).
Move the right half
of the cord to the left, passing it over
the curved segment next to the third knot,
and over
the left half of the cord.
Pass it through bight B under
- over.
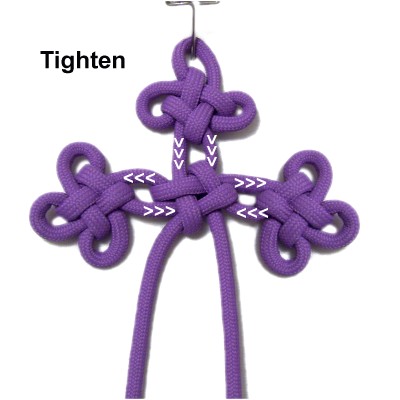
Step 8:
Tightening the Ju-i Knot can be a challenge.
Start by pulling on the segments between the first
three Cloverleaf knots, which will tighten the
fourth (in the center).
There will be too much space between the knots
once you do this, so you will need to remove the
slack in a specific order:
Remove the slack
beginning with the second
knot and moving forward to the fourth knot
in the center.
Continue toward the first
and third
knots, pulling the slack out all
the way through them.
Head toward the fourth
knot, then all the way through to the
ends.
Give the loops
a final tug to make sure the center of
each knot is tight.
When using slippery material like nylon,
you may need to add glue in the center of
each knot.
The Ju-i Knot is finished.
By
using any text or images on Free Macrame
Patterns, you are agreeing to ourTerms
of Use