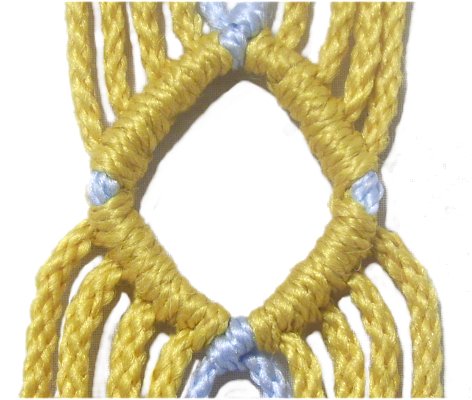
Description: The Empty Diamond
is a very unique design. I found this vintage
decorative knot in a book written in the late
1800's.
The reason this diamond is considered empty
is due to the fact that the cords do not pass
through the center. They are isolated to
the top and bottom edges of the diamond,
creating an open space.
You can finish off the cords in the back
of the diamond, if you want to use it as a
pendant. You must make it with material
that can be heat fused to the back surface, such
as Olefin, Nylon, or Polyester.
Make sure you
know the difference between holding and
working cords.
Click on the image to view the Double
Half Hitch instructions,
if you don't already know how to tie them
in diagonal rows.
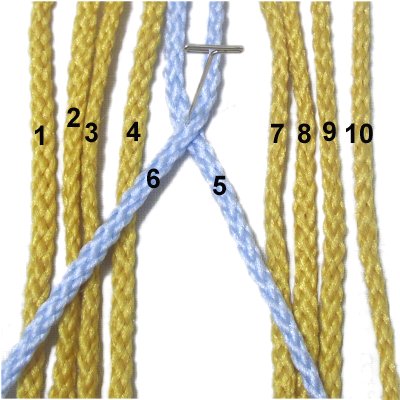
Top Portion of Empty Diamond
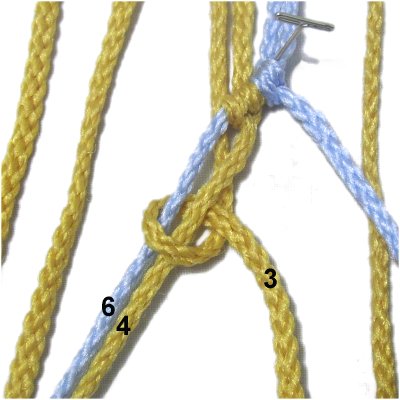
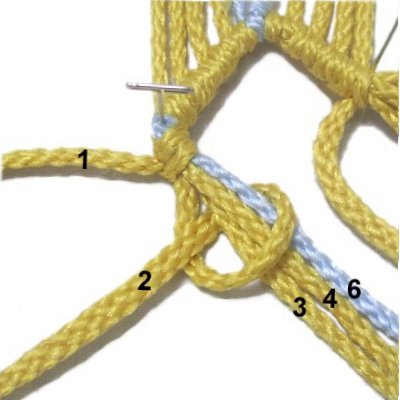
Step 1:
Secure 10 cords to your board with pins.
They should be at least 24 inches long.
Cords 5 and 6 are a different color to provide
a touch of contrast, and make the diamond more
appealing.
Mentally number the cords 1 - 10.
Cross cord 6 over
cord 5, heading left. Secure it at the
crossing point.
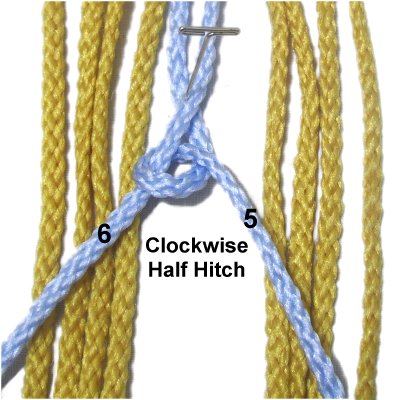
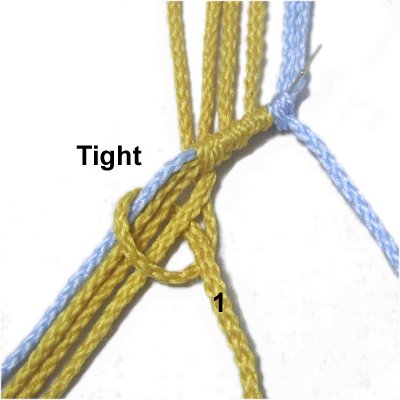
Step
2: Tie a clockwise
Half Hitch with cord 5, onto cord
6.
Slide it up next to the pin, then tie
another one to the left of the
first.
Two Half Hitches = One Double Half Hitch
(DHH)
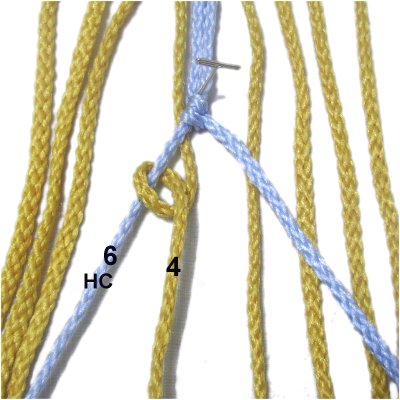
Step 2,
continued: Move cord 5 to the right,
on a diagonal slant. Move cord 6 to the left.
Secure both cords, and make sure they have
tension.
Remember that the holding cords determine the
overall shape of the diamond, so adjust the angle
until you like the shape.
Step
3: Tie a clockwise
DHH with cord
4, onto holding cord 6.
Move it next to the DHH you tied in step
2.
Step
4: Move cord
4 to the right
of holding cord 6, on the same diagonal
slant. It now becomes another
holding cord.
Attach cord
3 to holding cords 6 and 4 with a
DHH.
Step
5: Bring cord
3 to the right of the other
holding cords, and secure it in place.
Attach cord
2 to holding cords 6, 4, and 3
with a DHH.
Make sure you tighten the knot more than
the first two, so the width is the same.
Designer's
Tip:
The group of holding cords should always be neatly
arranged.
This will result in a straighter row of knots, and
make it easier to reverse direction when you
create the bottom of the Empty Diamond.
Step
6: Bring cord
2 to the right of the other
holding cords, then secure it.
Attach cord
1 to holding cords 6, 4, 3, and 2
with a DHH.
Make sure this knot is TIGHT, so the bar
is the same width in this area.
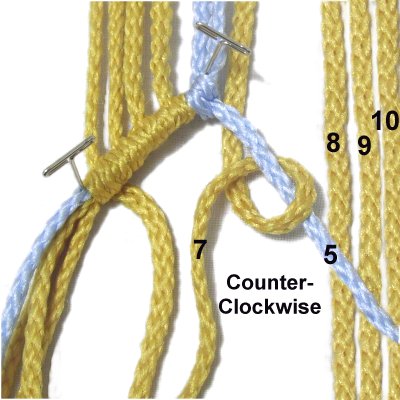
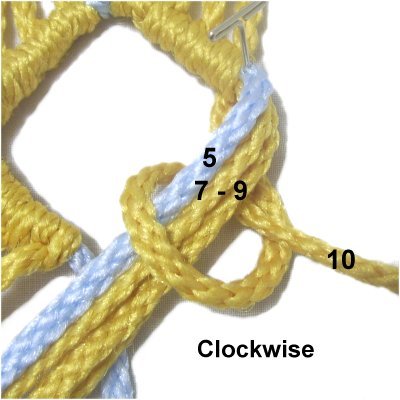
Step
7:To make the
upper right side of the Empty Diamond,
tie counter-clockwise
DHH as follows:
Attach cord
7 to holding cord 5.
Attach cord
8 to holding cords 7 and 5.
Attach cord
9 to holding cords 8, 7, and
5.
Attach cord
10 to holding cords 9, 8, 7,
and 5.
Step 7,
continued: Remember to increase the
tightness of the DHH made with cords 9 and 10, so
the bar is as even as possible.
Before moving on, place a pin through all 4
holding cords on each side, next to the last DHH
tied. Make sure the two rows of DHH
are straight.
Lower Portion of Empty Diamond
For the top portion of the Empty Diamond, you
took a working cord and turned it into a holding
cord, which is considered adding.
Now you will reverse the process, and subtract
one cord in each step. So after you complete each
step below, push the working cord aside and don't
use it again.
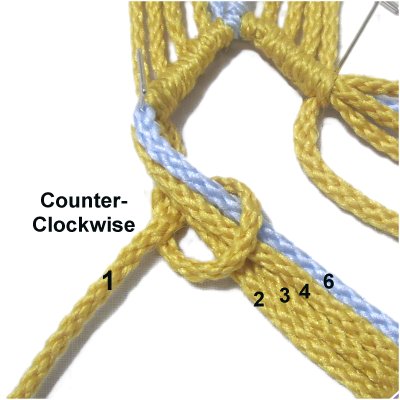
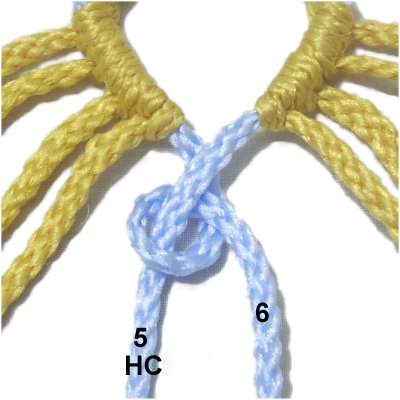
Step
8: Move the left
group of holding cords to the
right, on the same diagonal slant as the
top portion.
Secure them so they all have tension, and
cord 6
is at the top of the group.
Move cord
1 under the entire group, heading
left.
Step
9: Attach cord
1 to all four holding cords
with a counter-clockwise
DHH. Make sure
it's TIGHT.
As you tighten, push the knot close to the
last DHH in the top half, but not
completely against it (see next image).
Leaving a small gap will create a better
angle at the corner, and allow the second
color (blue) to show.
Step
10:Use cord
2 next, tying a
DHH onto holding cords 3, 4, and 6.
Step 11:
Use cord
3 to tie a DHH onto holding
cords 4 and 6.
Use cord
4 to tie a DHH onto holding cord 6.
These knots do not need to be as tight as
those made in the previous steps.
Step
12: To make the lower
right area of the Empty Diamond, tie clockwise
DHH:
Attach cord
10 to holding cords 7 - 9
and 5.
Attach cord
9 to holding cords 7, 8,
and 5.
Attach cord
8 to holding cords 7 and
5.
Attach cord
7 to holding cord 5.
Step
13: Close the diamond by
attaching cord 6 (left) to holding cord 5
(right).
The ends of all the cords can now be
finished off, or used to tie other knots.
By
using any text or images on Free Macrame
Patterns, you are agreeing to ourTerms
of Use