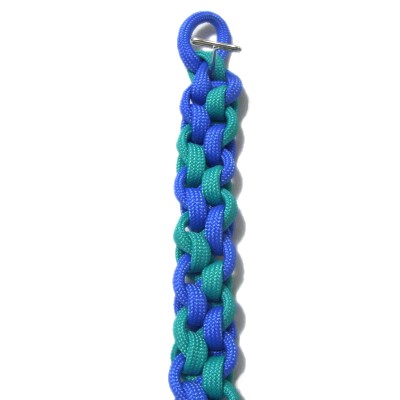
Description:
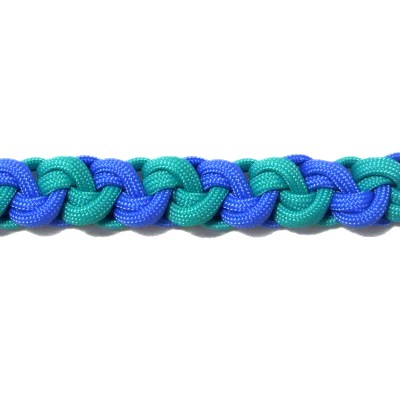
The Crashing Waves Bar gets its name from
the curved elements that look like ocean ripples
on the front of the bar. The loops on the
back are arranged diagonally and alternate
colors. As you make the design, you will be
looking at the back.
You could use this decorative knot sennit for a
Macrame belt, bracelet, or any project where you
need a slender chain of knots. The
instructions include a loop at one end that can be
used as a clasp.
The material used in the example is 550 Paracord.
Please read the bottom section of Cord
Preparation if you intend to use
this material and do not know how to prepare it
for knotting.
I
found this technique on the Fusion
Knots website.
Click on the image or link to visit the
site.
The video gallery contains tutorials for a
wide variety of combination knots and
techniques.
Preparation
and Loop
To practice the Crashing Waves Bar, you need two
cords of different colors at least 60 inches
long.
The cords should be at least 7.5
x the finished length you plan to make if
you are using this design in a project.
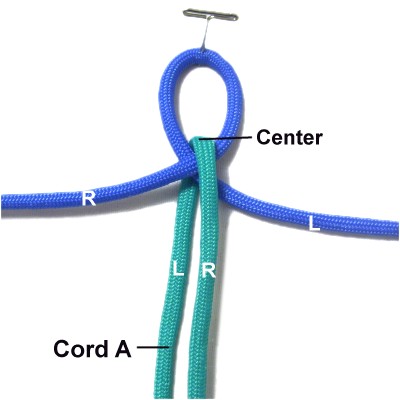
Step
1: Make a loop in the
center of cord
B, crossing right
over left.
Fold cord
A in half and arrange it around
the crossing point of the loop vertically.
The left half should rest under
the crossed area and the right half over
it.
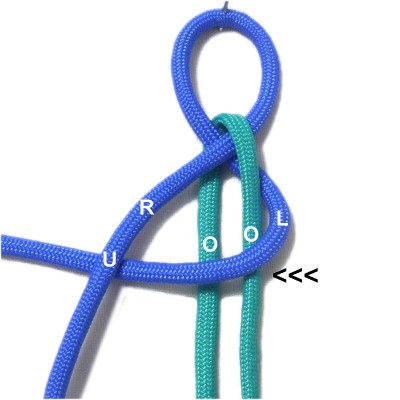
Move the left half
of cord
B to the left, passing over
both halves of cord A.
Bring itunder
the right half of cord B.
Move the right half
of cord
Bto
the right, passingunder
both halves of cord A.
Pull it out on the right, passing it over
the left half of cord B where it curves.
Tighten the knot and adjust the size of
the loop so it's suitable for your
project.
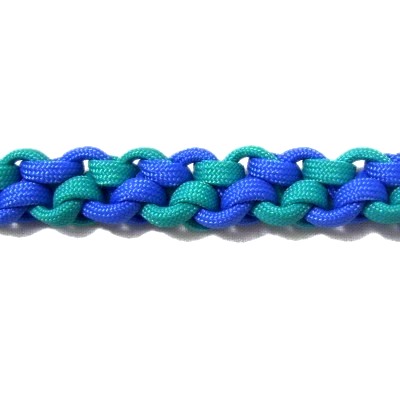
Crashing Waves Bar Design
Each knot is made with three cords, which switch
positions to form an alternating color
pattern.
Mentally number the four segments where they rest
now, and view them as four separate cords.
Move cord
3backward,
folding it over
the crossing point of cords 2 and 4.
Rotate it clockwise
to the right, passing it over
cord 3 and under
cord 4.
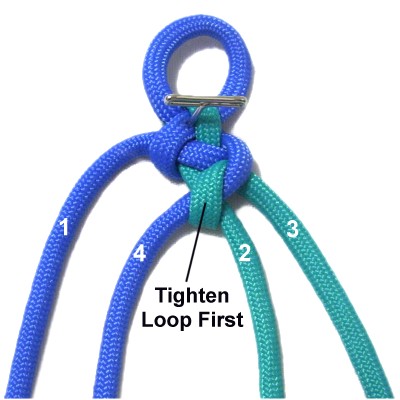
Tighten the
loop first, by pulling on cord
3.
Then tighten cords 2 and 4 until the knot
is firm.
Designer's
Tip: It's important to understand
the concept for the Crashing Waves Bar, since the
cords switch positions.
Try to find these features in the next images.
Locate the cord used to make the loop in the
previous knot.
Pass it under
the cord next to it. That cord is then
moved aside.
The remaining three cords are used to make
the new knot. One is the cord used to
make the previous loop. Another is the
cord you moved aside in the previous
step. The third is resting between them.
The cord in the middle of the group is used
to make the loop for the new knot. The
other two are crossed.
Cross the two cords left
over right for all the knots on the
left (step 3).
Cross the two cords right
over left for all the knots on the
right (step 2).
When you make the loop, the cord passes over
the crossing point and under
the cord on the outside.
On the right, the loop is made clockwise
heading right.
On the left, the loop is made counter-clockwise
heading left.
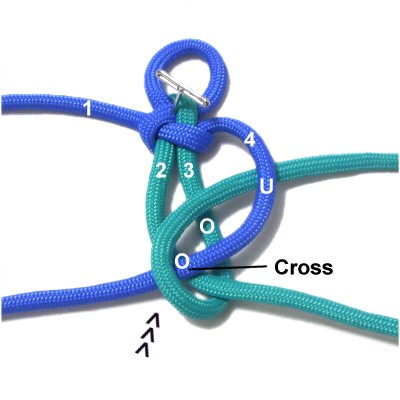
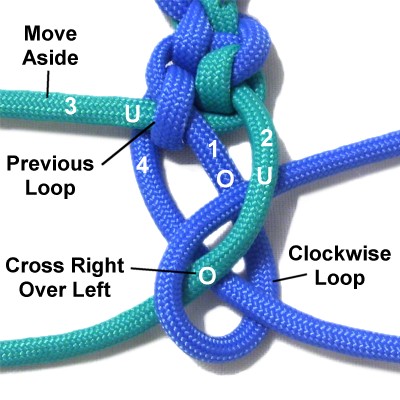
Step
3: Locate cord
3, which was used to make the
loop in the previous step.
Move it under
cord 2, which is next to it.
Move cord 2 aside.
Arrange cord
4 so it's vertical. It's in
the middle of the group, so will be used
to make the loop for the new knot.
Cross cord
1overcord
3 (left over right), resting on
top of cord 4.
Move cord
4 backward,
folding it over
the crossing point of cords 1 and 3.
Rotate it counter-clockwise
toward the left, passing it over
cord 4 and under
cord 1.
Tighten the loop first, then the rest of
the knot.
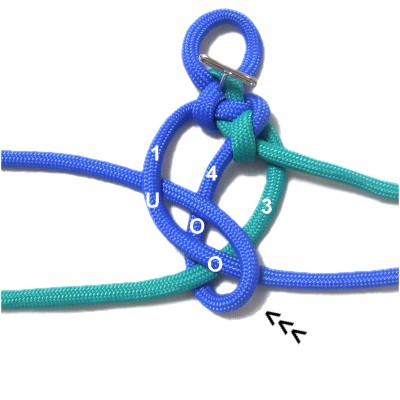
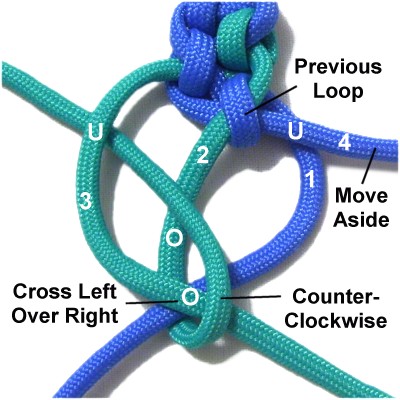
Step
4: Locate cord
4, which was used
to make the previous loop.
Pass it undercord
3, then move cord 3 aside.
Cross cord 2 over
cord 4 (right over left), resting on cord
1. Make the new loop with cord
1, rotating clockwise.
Tighten the loop, then the crossed cords.
Step
5: Locate cord
1 and move it undercord
4. Move cord 4 aside.
Cross cord 3 over cord 1 (left over right)
resting on cord 2. Make a new loop
with cord
2, rotating counter-clockwise.
Tighten the new knot.
Step
6:Repeat
steps 4 and 5 several
times. The cords will switch
position each time you tie a new knot.
Stop when the Crashing Waves Bar is the
size you need for you project.
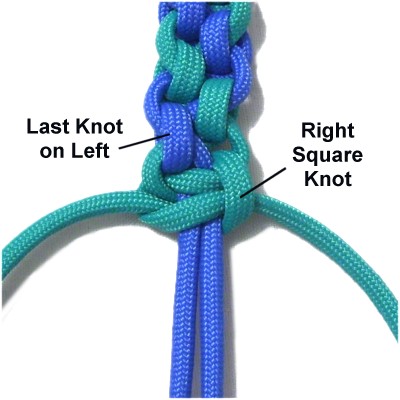
Finishing the
Bar
Step
7: Tie a Square knot with
the two cords furthest to the right and
left.
Tie a RIGHT SK if the loop for the last
knot you tied in step 6 is on the left.
Tie a LEFT SK if the last loop is on the
right.
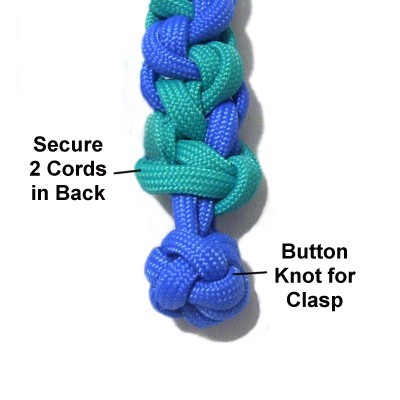
Step
8: Finish off the 2 cords
used in step 7 by securing them to the
BACK of the Crashing Waves bar, which is
the side you've been looking at.
The remaining two cords can be used to tie
a button knot if you need one for a clasp.
Optional
By
using any text or images on Free Macrame
Patterns, you are agreeing to ourTerms
of Use