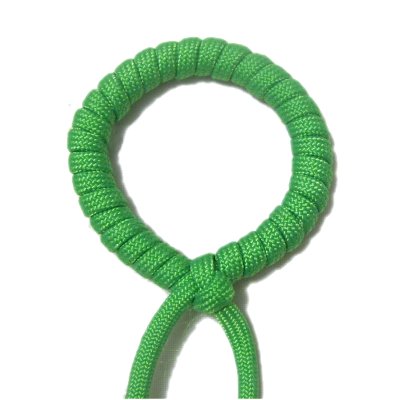
Description: The Wrapped Ring
is easy to tie and results in a flexible
design that can be used in a variety of Macrame
projects. It's not going to be perfectly
circular, so keep that in mind if you use it in
your project.
It can be used at the top of items like plant
hangers and wall hangings, if you prefer not to
use a regular ring. Just mount the cords
over the knot at the bottom (to hide it).
This ring makes a great clasp for Micro-Macrame
bracelets and necklaces. However, when made with
fine materials 2mm or less, it will have a
tendency to twist somewhat. To avoid that,
the coils should all be tightened the same.
Also, make it as small as possible.
I recommend you practice
making it with the material you are using for
your project, to see if it will be suitable.
To practice, you need one cord, at least 50
inches long.
When using the Wrapped Ring in a Macrame project,
you would start it at the center of the
cord. One half of the cord will become
shorter than the other. You can try to
start it elsewhere on the cord, but chances are
the two halves will still be different
lengths.
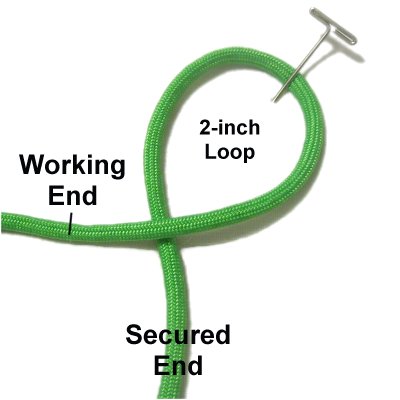
Step 1: Secure
one end of the cord to your board
vertically.
Make a 2-inch clockwise
loop approximately 6 inches from the
secured end of the cord.
Step 2: Wrap the
working end around the loop over and
over until it's completely covered.
You may find this easier if you hold
the cord after the first few wraps are
made.
Make sure the coils are tight
and do not overlap. Push them close
together as you progress.
Designer's
Tip: The reason these instructions
were changed was to avoid the uneven surface that
was on the original design.
By wrapping in one direction, the ring is much
smoother and more appealing.
Step 3:
Pull the secured
end firmly to tighten the
ring. You may need to push the coils
together, or even tighten them more
afterward.
Make adjustments now, before moving on to
the next step.
Step 4: Complete the
ring by tying a Half Hitch with the secured
end around the working end.
This is optional if you prefer to
finish it with a different type of knot.
You would now
use the remaining material for other
knots, if you are making something like a
bracelet.
To hide the knot at the bottom, you can
place other cords over it, such as if you
were using the ring in a plant hanger
design.
By using any
text or images on Free Macrame Patterns, you are
agreeing to ourTerms of Use.