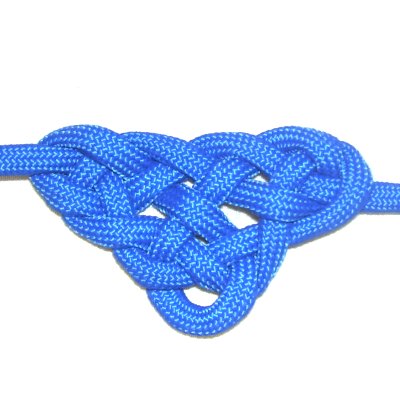
Description: These two Woven
Triangles feature the weaving common to all
Celtic knots. Both can be used as a focal point
for a Macrame bracelet or choker design.
The Triangular
knot features three sides that are
fairly straight, with rounded angles.
The Longhorn
Knot has wider profile and sharper
angles.
Make sure you know the difference between a loop
and a bight:
Loop =
Circular, with a crossing point
Bight: Narrow, formed by
folding the cord
The material used in the examples is Paracord,
which needs to be prepared and finished by
melting the tips with a flame.
These two woven triangles are on the Fusion
Knotswebsite.Click on the image or link to
visit.
The video gallery contains tutorials
for a variety of very unique and
appealing knot designs.
The two designs on this page are
called:
The
Triangle Knot and the Longhorn
Knot
Triangular Knot
Important:
The key to making both woven triangles is to
keep track of the two halves of the cord, so you
don't confuse them.
Label
the ends with different colored tape.
Step 1: Cut one
cord, 60 inches long, to practice the
Triangular knot.
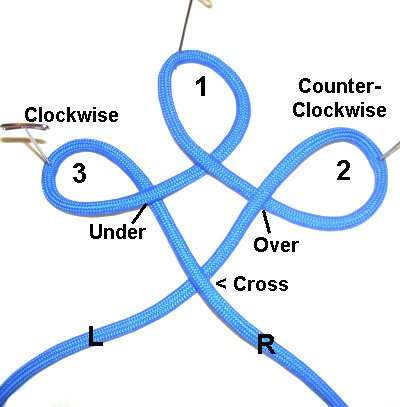
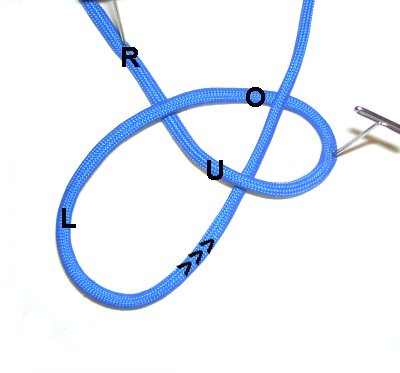
Make loop
1 in the center
of the cord, crossing the left half over
the right.
The
two halves are now switched.
Step
2: Make loop
2 with the left
half of the cord, (now on the
right).
Rotate counter-clockwise,
pass over
to make the crossing point.
Make loop
3 with the right
half of the cord, in a clockwise
direction. Pass under
to form the crossing point.
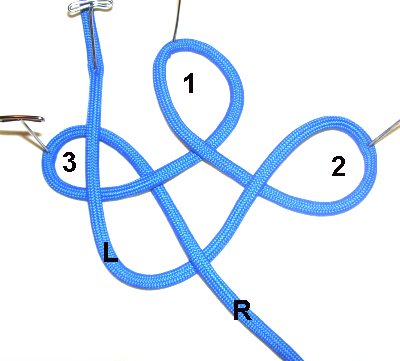
Step 2,
continued: Just below, cross the
two halves right
over left, which puts them back in their
original positions.
Step 3: Bring
the left
half up, passing overLoop
3.
Secure it to your board, since you
won't be using it
again.
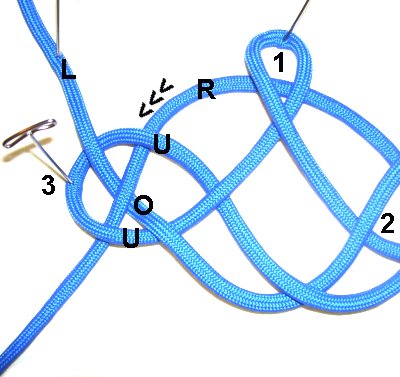
Step 4: Move the
right
halfunderloops
2 and 1, as you bring it to the
upper area.
Step 5: Weave the
right end through
Loop 3.
Pass under
- over - under the three
segments.
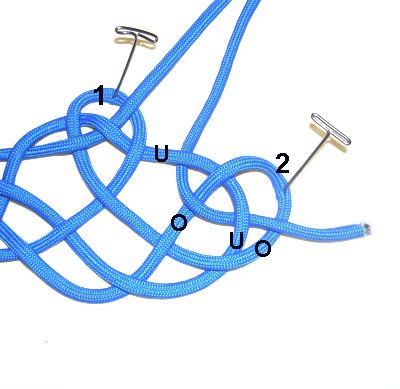
Step 6: Move the
right end in a clockwisedirection,passingoverthe left end.
Move it under
the segment betweenloops
1 and 3.
Weave it through loop
1,over
- under - over the three
segments (left to right).
Step 7: Move the right
end down, passing under
the segment betweenloops
1 and 2.
Weave it through loop
2, over
- under - over the three
segments.
It's important to tighten and adjust
both woven triangles on this page slowly,
until they are the shape and size you
want.
The loops form the three points, with
loop 1 at the bottom.
Longhorn Knot
The Longhorn Knot is the most unique of the two
woven triangles on this page. Pay close
attention to the placement of the bights and
ends.
Cut one cord, at least 60 inches long.
Place different types of tape on the two ends,
to tell them apart.
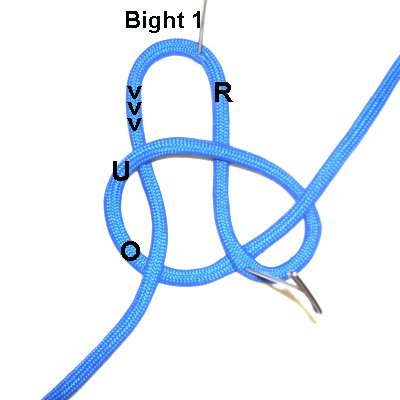
Step 1: Make theright
loop at the center of
the cord, crossing left
over right.
Turn the loop sideways,
so the curved portion (crook) is on the
right, with the crossing point on the
left.
Step
2: To make the left
loop, rotate the lefthalf of
the cord counter-clockwise.
Pass it through the right loop under
- over (from below).
Note that the two halves of the cord
have now switched
places.
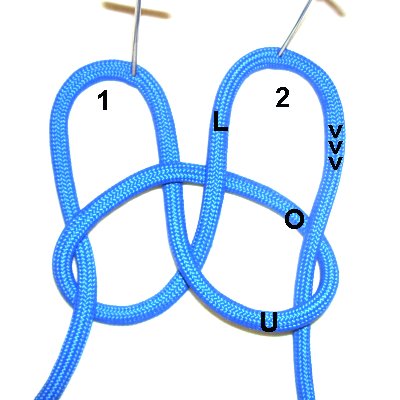
Step 3: Fold the theright
half to form
bight 1 (on the left).
Bring it straight down, passing it
through the left loopunder
- over (from below).
Secure the bight to your board.
Fold the left
half to make bight 2
(on the right).
Bring it straight down, passing it
through the right
loopover
- under(from the top).
Secure it to your board.
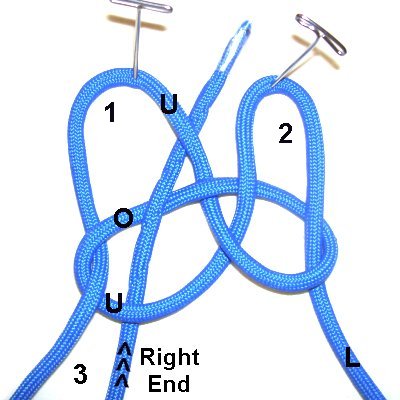
Step 4: Fold
the right
end to make bight
3 (lower left area).
Weave it through the left
loop AND bight
1, passing under
- over - under (towards the
top).
Rotate the left
endclockwise,
and pass it through bight
3over
- under(from
the top).
Weave the end through the right
loop AND bight
2, over
- under - over the three
segments.
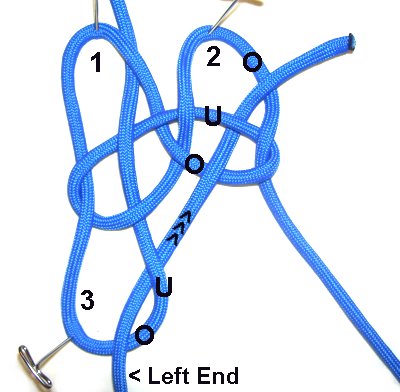
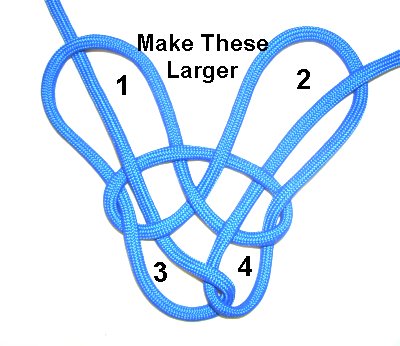
Step 5: Pull on bights
1 and 2 at the top, to make
them larger.
Bights 3 and 4 will become a bit
tighter.
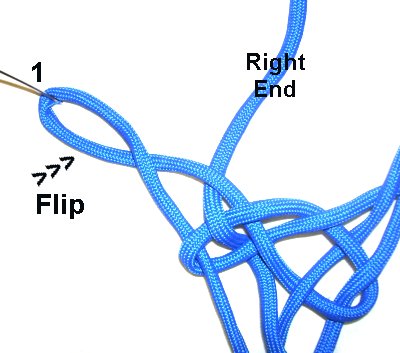
Step
6:Move
the left
end to the right, to get it out
of your way.
Flip the top
portion of bight
2 over the lower portion, forming
a loop.
Pass the left
end through the loop you just
made, under
- over (from below).
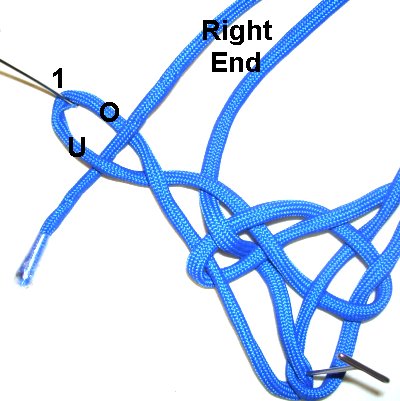
Step 7: Move the right end
to get it out of your way.
Flip the lower
portion of bight
1 over the top, to form a loop.
Pass the right
end through the loopover
- under (from the top).
Step 8: Woven
triangles need to be tightened a little
at a time, keeping the cord flat.
The goal for this design is to form a
wide triangular shape, with bights
3 and 4 at the bottom.
By using any
text or images on Free Macrame Patterns, you are
agreeing to ourTerms of Use.