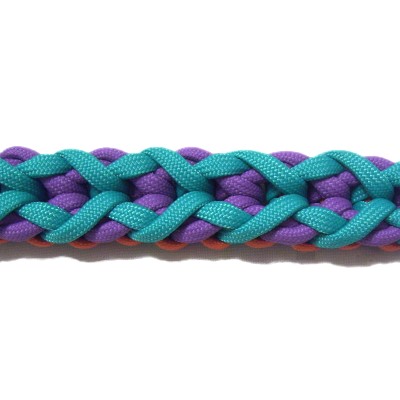
Description:
The Webbed Endless Falls technique is
formed with two working cords that are placed in
alternate positions.
The loops made by cord
A will rest on top of those made with the
other working cord. This is
considered the primary cord, so as you learn
this technique, focus on it's position.
In the example shown, cord
A is turquoise and cord
B is purple.
There is also
a holding
cord, which is orange in the
example shown.
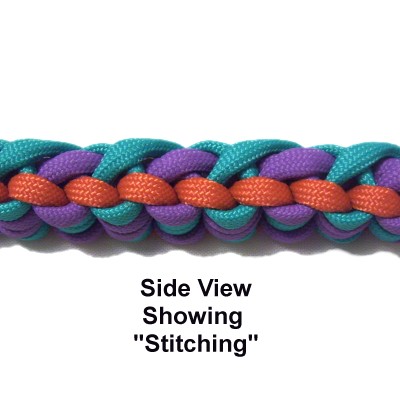
It will form a series of loops resembling
"stitching" along the sides of the sennit.
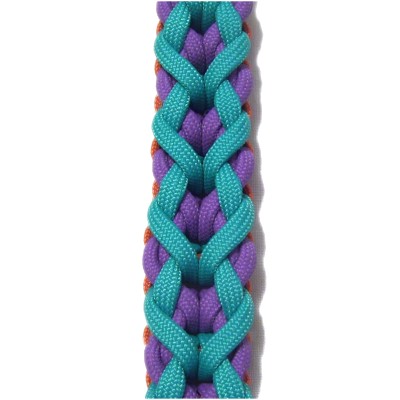
As you can see from the images, this is a thick
sennit that can be used for items like Paracord
bracelets, pet collars and leashes, belts, and
similar projects.
The instructions include a loop, which is optional
if you prefer to start the sennit in a different
way.
2018
Update: The images and text have
been changed, so contact me if you need the
original page.
Be sure to see the video gallery, where
you will find tutorials for many unique
combination and historical knots that can
be used for Macrame projects.
Preparation and Loop
You need 3 cords of
different colors to make the Webbed Endless Falls
technique. When practicing, cut the cords to
60 inches.
When using this design in a project, the cords
should be at least 10 times the finished
length of the item you wish to
make.
Add extra length to cord
A if you plan to make a button knot for a
closure.
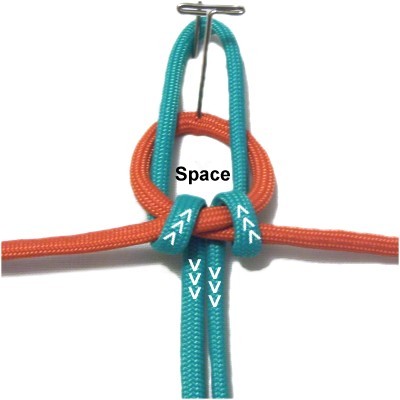
Step
1: Fold working cord A
at the center, and secure it to your
board.
Slide the holding
cord under it, and secure it so
the centers line up.
Cross the two halves of the holding cord
right over left, arranged on
top of cord A.
Fold both
halves of cord
A backward, passing over
the crossed area of the holding
cord.
Bring them through the space between the
two halves, then under
the crossed area as you pull them toward
you.
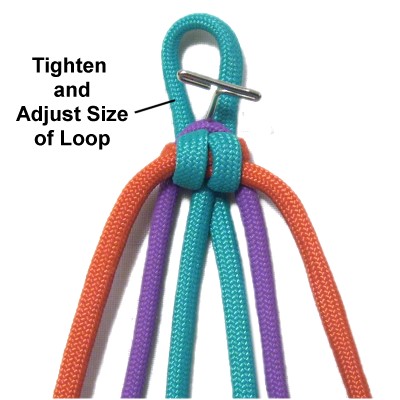
Step
2: Fold working
cord B in half and pass it
through the loop made by the holding
cord.
It should rest undercord
A.
Move the folded portion of cord
B over cord A, so it rests in front
of it.
Tighten by
pulling on the holding cord first,
followed by both working cords. Adjust the
size of the loop made by cord
A.
Make the loop 3/4-inch in size if you plan
to tie a button knot at the other end of
the sennit.
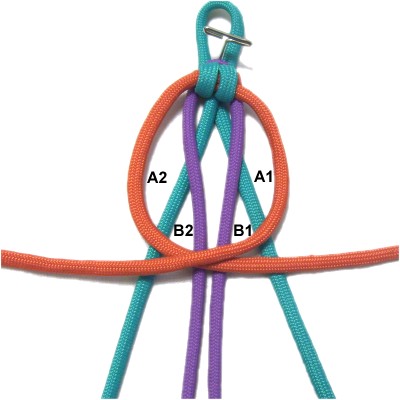
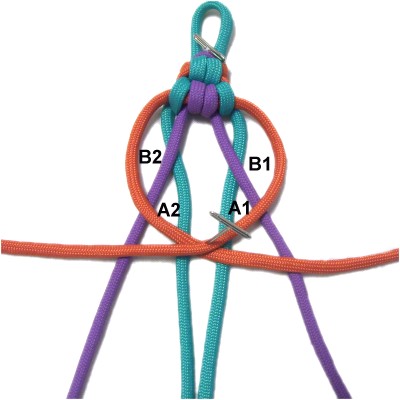
Webbed Endless Falls - Row 1
For each row, you are making a loop with each
half of the working cords, passing them around the
holding cord so they rest in a specific
position.
Important:
Pay close attention to the position of cord
A. It MUST remain under
cord B at all times, or the design won't work.
Step
3: Move both halves of cord
Aundercord
B, pulling them outward
to the right and left, as shown by the
arrows in this image.
Mentally label each half of the working cords as
follows:
Cord
A (Right Half) = A1
Cord
A (Left Half) = A2
Cord
B (Right Half) = B1
Cord
B (Left Half) = B2
These cords will pass through the spaces with
the same labels (see next image).
Make a LARGE
loop by crossing the two halves of the holding
cordright
over left, arranging it on top of
the working cords. Secure the
crossing point.
Mentally label the four spaces
as shown.
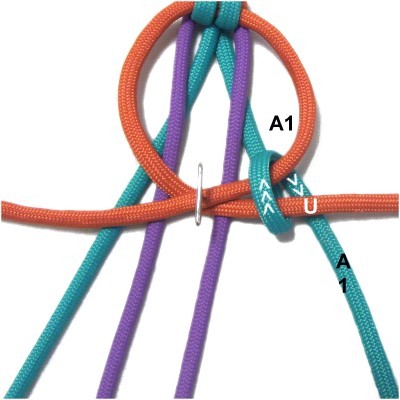
Step
4: Move the right
half of cord
A (A1) backward, passing over
the crossed area of the holding cord.
Bring it through the space labeled A1.
Pull it under
the holding cord, then toward you to
complete the loop.
Make sure it passes under
the portion of the holding cord that leads
to the end.
Designer's
Tip: Another way to look at this
important part of the Webbed Endless Falls is that
the right half of cord
A needs to pass through the space to the
right of the portion coming from the previous
knot.
Cord B will pass through the space between the two
working cords.
Move the right
half of cord
B (B1) backward, passing over
the crossed area of the holding cord.
Bring it through the space labeled B1.
Pull it under
the holding cord, then toward you to
complete the loop.
You can see the space better in the image
for step 3.
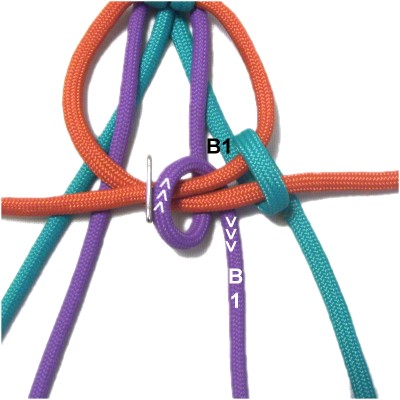
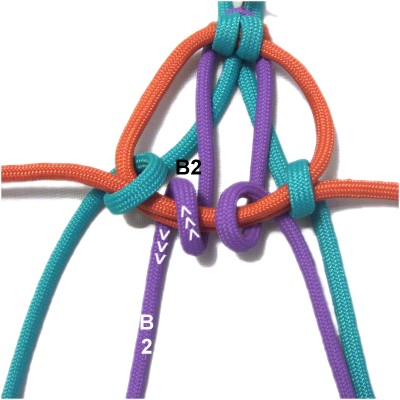
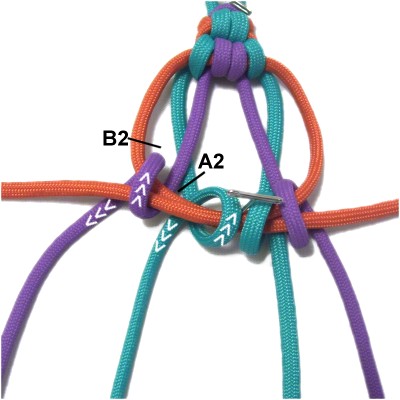
Step
5: Move the left
half of cord
A (A2) backward, passing over
the crossed area of the holding cord.
Bring it through the space labeled A2.
Pull it under
the holding cord, then toward you to
complete the loop.
Make sure it passes under
the portion of the holding cord that leads
to the end.
Move the left
half of cord
B (B2) backward, passing over
the crossed area of the holding cord.
Bring it through the space labeled B2.
Pull it under
the holding cord, then toward you to
complete the loop.
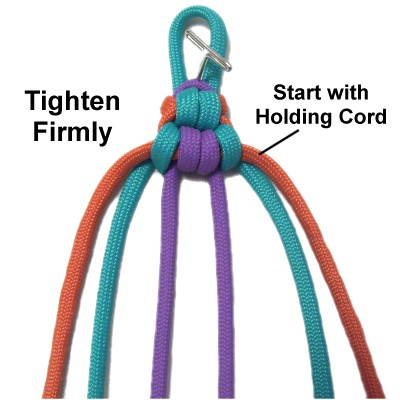
The best way
to tighten Webbed Endless Falls is to pull
both halves of the holding
cord first.
Then tighten both parts of cord
A, followed by cord
B.
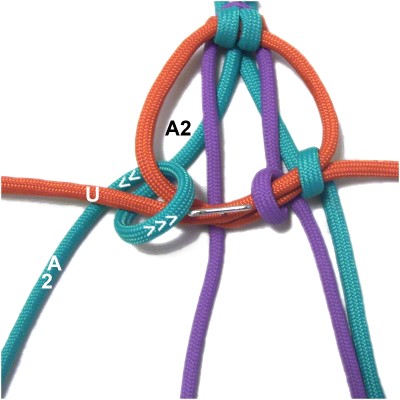
Webbed Endless Falls - Row 2
Step
6: Move both halves of cord
Aundercord
B. Move cord B to the right
and left, so that cord A is on the inside.
Mentally label the four parts as you did
in the previous row (step 3).
Make a loop
with the holding
cord, crossing right over left,
resting on top of the working cords.
Mentally label the spaces as shown in this
image.
These labels are different than step 3
because the cords have switched places.
Step
7: Repeat
step 4with the cords
in their new arrangement. Cord
B passes through the space
labeled B1.
Cord
A passes through the space
between the two working cords, labeled A1.
Repeat
step 5 with the cords in their
new positions.
Cord
B passes through B2
as you make the loop.
Cord
A passes through A2,
which is between the two
cords.
Tighten the loops firmly.
Complete the Sennit
Step
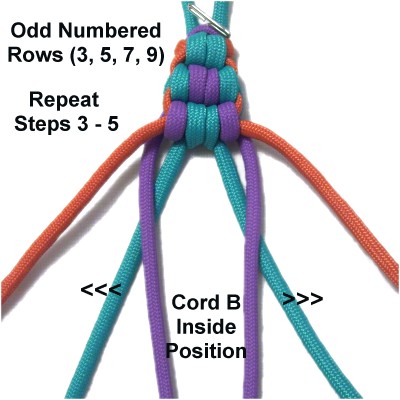
8:Repeat
steps 3 - 5 for the odd numbed
rows (3, 5, 7, 9) as you continue making
the Webbed Endless Falls.
Cord
B will be on the inside position.
Remember to make sure cord A is under
cord B.
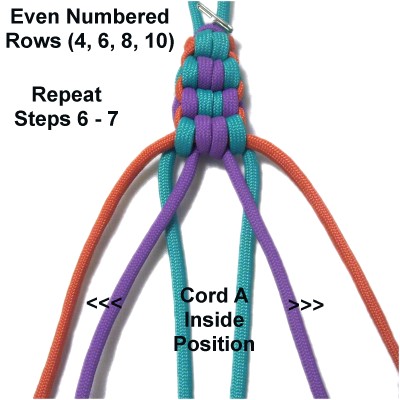
Repeat
steps 6 and 7 when you create the
even numbered rows (4, 6, 8, 10).
Cord
A will be on the inside position.
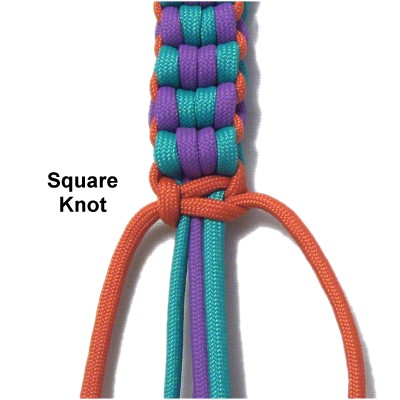
Step
9: When the sennit is
finished, you will need to tie a finishing
knot to secure the cords.
This image shows a Square Knot tied with
the holding cord, which is the best
option.
Turn over the
sennit to see the front of the Webbed
Endless Falls design.
By using any
text or images on Free Macrame Patterns, you are
agreeing to ourTerms of Use.