Description:
The Wave Braid features three cords that
curve in a wavelength pattern around a straight
holding cord that runs through the
center.
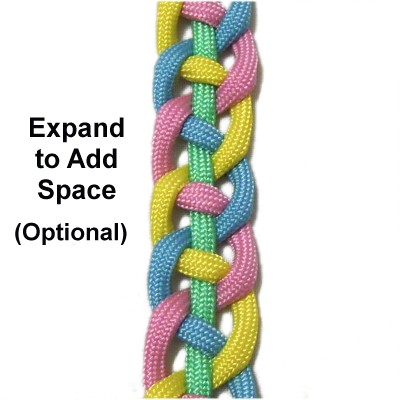
The best way to make the braid look neat is to
push the cords close together as you create it,
then expand and stretch the design to add extra
space when you are finished.
This form of braiding can be a challenge. When
practicing, be sure to use four different colors.
Focus on understanding the concept
as you progress through the steps described below.
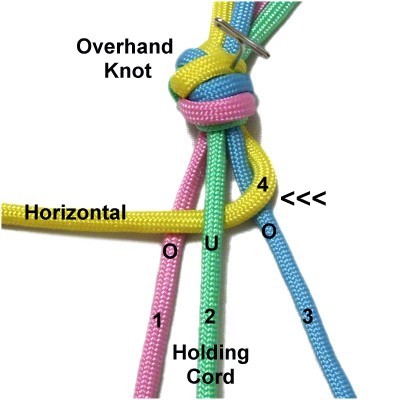
Step 1:
You need four 36-inch cords to practice the Wave
Braid.
Tie them together with an Overhand knot near one
end of the cords (optional).
Mentally number the cords 1 - 4 (left to right).
Cord 2 is the holding cord, and should remain
straight. Secure it near the front of your
board with tension.
Start the
braiding with the working cord furthest to
the right, which is cord 4. Move it
over
cord 3, under
the holding cord (2), and over
cord 1.
Make sure cord 4 remains horizontal
when you are through.
Designer's
Tip: Place a pin on each side of
the braid, so you can drape the cords over the
pins to keep them horizontal.
You don't need to actually secure the cords after
you move them, since they will only be horizontal
for a short time.
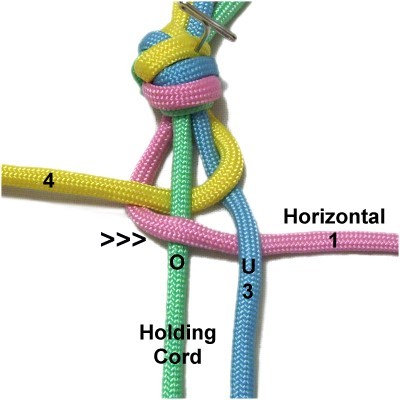
Step
2: Now you use the working
cord to the LEFT of the holding cord,
which is cord
1.
Move it over
the holding cord, then under
cord 3.
It should remain horizontal when you are
done.
Here is the
CONCEPT for the rest of the Wave Braid:
Each step begins by moving one working cord
to a vertical position, where it's combined
with the holding cord so you always have two
to weave through.
When choosing which working cord to weave,
you alternate between the working cord resting
to right of the holding cord, and the one
resting to the left of it.
Each working cord remains horizontal for
one step. Then it's arranged vertically
in the following step. After that, it's moved
horizontally again, but in the opposite
direction.
Each time you move a working cord right
to left, you pass it under
the holding cord,and over
the cord next to it. When moving left
to right, it's the opposite (over -
under). The
arrows in the images show the direction.
Remember that you are making a wavy pattern
with each cord, so the cords should be
CURVED. Make sure you don't fold the
cords or allow the material to become
kinked.
Push the woven portions close together
while constructing the braid. When it's
completed, you can stretch it and the spacing
will be more even.
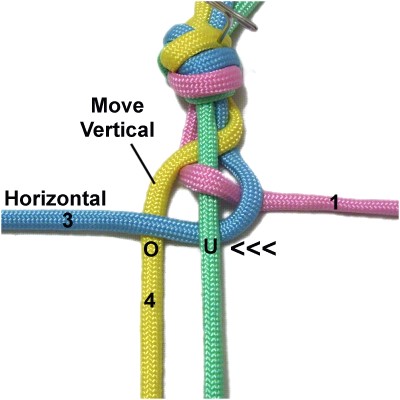
Step
3: Move cord
4 to a vertical position.
Now you will weave cord 3, since it rests
to the RIGHT of the holding cord.
You are moving right
to left, so pass it under
the holding cord and over
cord 4. Keep it horizontal when you
are done.
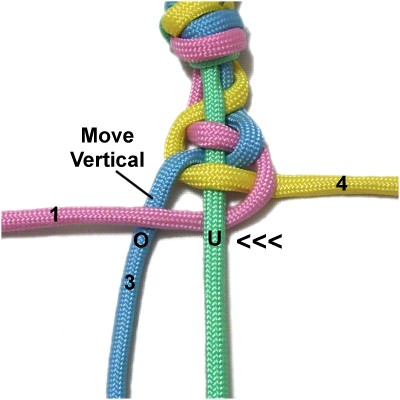
Step
4: Move cord
1 to a vertical position.
Now you weave cord
4, since it rests to the LEFT of
the holding cord.
You are moving left
to right, so pass it over
the holding cord and under
cord 1. Leave it horizontal when
you're finished.
Step
5: Move cord
3 to a vertical position.
Cord
1 is to the RIGHT of the holding
cord, so pass it under
the holding cord and over
cord 3 (right to left).
Keep it horizontal after you are finished.
Step
6: Move cord
4 to a vertical position.
Cord
3 is to the LEFT of the holding
cord, so pass it over
the holding cord and under
cord 4 (left to right).
Keep it horizontal after you are finished.
Step
7: Move cord
1 to a vertical position.
Cord
4 is to the RIGHT of the holding
cord, so pass it under
the holding cord and over
cord 1 (right to left).
Step
8:Repeat
steps 2 - 7 several more times,
until the Wave Braid is the size you wish
to make.
This image shows step
2.
Before you
finish, expand the weave to add some
space, until you can clearly see the
curved elements.
This is optional if you prefer a close
weave.
Make adjustments to the tightness and
spacing before moving on.
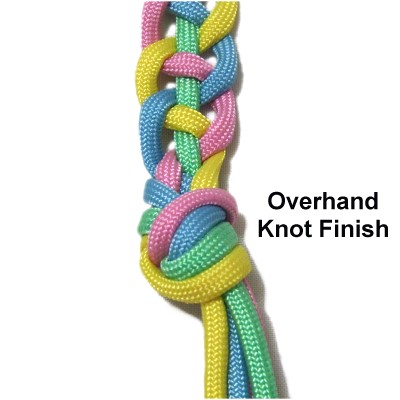
To finish the
Wave Braid, you can simply tie another
Overhand knot, or use a different knot to
secure the cords.
By
using any text or images on Free Macrame
Patterns, you are agreeing to ourTerms
of Use