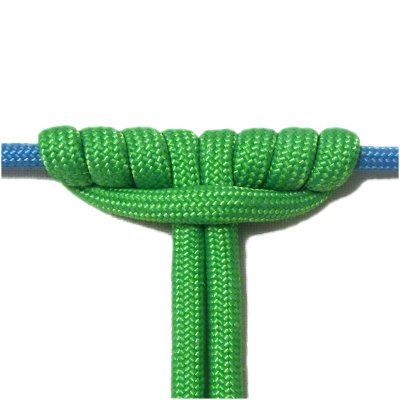
Description:
The Prusik Knot is primarily used in
climbing, but it can be used for Macrame as a
decorative knot. It's sometimes called the Triple
Sliding Hitch.
It's similar to other hitches, but is wider and
has several loops. It needs to be tied to a
holding cord, dowel, or other item that's rectangular.
You can attach it to a round ring if you use very
flexible material.
This is a great mounting knot when you need to use
as few cords as possible, but want to cover a
large area of the dowel or holding cord.
To practice, you need one working cord at
least 36 inches long. You
also need a holding cord or dowel.
When using this knot in a Macrame project, add 6
inches to whatever cord length the
pattern requires.
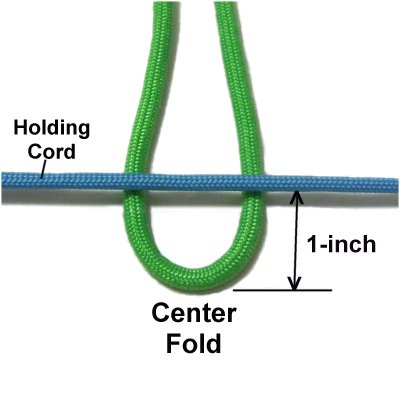
Step 1: Secure
the holding cord to your board so it's horizontal.
Make sure it is stretched, so it has tension.
Fold the working cord in half and slide it under
the holding cord.
The center fold should be close to you,
with the ends heading towards the back of
your board.
The center area should be no
more than 1-inch from the
holding cord.
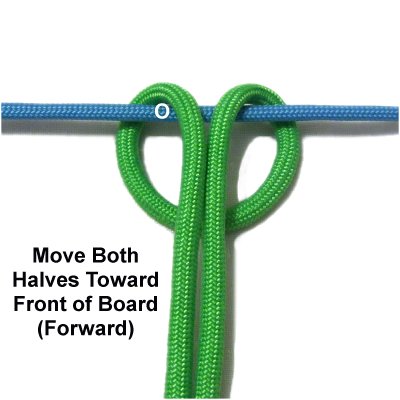
Step
2: Move both halves of the
working cord towards the front of the
board (forward)
so they pass over
the holding cord.
Designer's
Tip: I will use the the terms forward
and backward
to describe the direction of the movements in the
remaining steps:
Forward = Towards the front of the board,
which is closest to you.
Backward = Towards the back of the board.
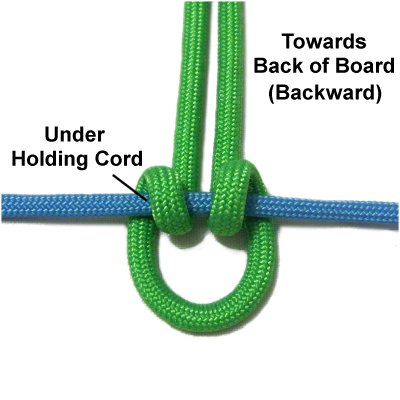
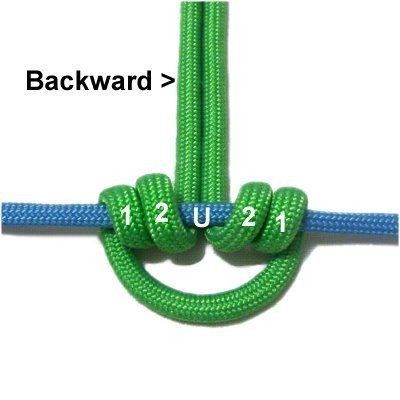
Step
3: Wrap both halves under
the holding cord, then move them backward.
The next set of loops need to rest in the
center area, so move these two loops
further apart. (See next image)
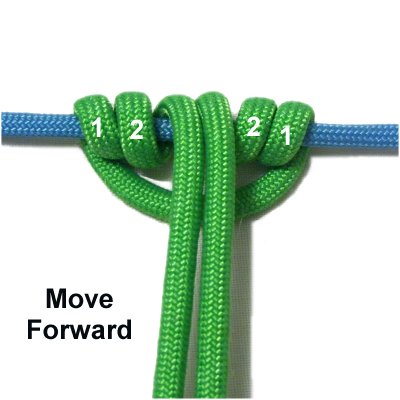
Step
4: To start the second set
of loops, move the two halves of the cord
forward
again, over
the holding cord.
They should fit between
the first pair of loops.
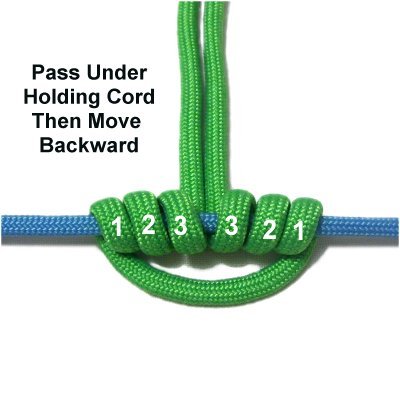
Step
5: Complete the second set
of loops by moving the two halves
backward, after passing them under
the holding cord.
Spread the loops to the sides to make room
for the third set of loops. (see next
image)
Step
6: To start the third set
of loops, move both halves of the working
cord forward,
passing over
the holding cord.
Fit them between the other loops.
Step
7: Complete the first set
of loops by passing the two halves under
the holding cord, then moving them
backward.
Spread the loops to the sides one more
time.
Step
8: Move the cords forwardoverthe
holding cord, between the third set of
loops.
Pass them under
the center fold of the working cord.
To tighten the Prusik Knot, spin the loops
to remove the slack. Work from the outside
moving inward, in the order the loops were
made.
By
using any text or images on Free Macrame
Patterns, you are agreeing to ourTerms
of Use