Description:
The Plafond knot can be described as a
folded square surrounded by a rectangular
frame. It mimics decorations seen on the
ceilings of temples and palaces.
You can use it as a pendant, for
Micro-Macrame earrings, holiday ornaments,
or similar projects.
These instructions show you how to tie the
knot using the traditional
method.
To practice the Plafond knot, you need one cord
at least 60 inches long. You will also need
a project board and pins.
Fold the cord in half and secure it at the center,
arranged vertically.
Designer's
Tip: The measurements described
below will make the knot very large, which I
recommend you do the first time. Once you've
learned the steps, make it again at half the size.
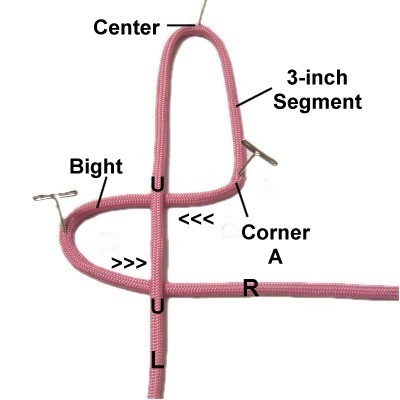
Step
1: Measure the right
half of the cord from the center
fold to 3 inches. Place a pin at
that point, and mentally label it corner A.
Fold the cord to form a horizontal
bight and slide it under
the left half of the cord.
The fold should be on the left.
Move the right half
of the cord toward the center fold
(backward), forming a wide curved area on
the right.
Arrange it over
both halves of the cord as you move it to
the left horizontally.
Step
2: Move the right half of
the cord forward and to the right, passing
it under
both halves of the cord.
This creates another folded area like
the first bight.
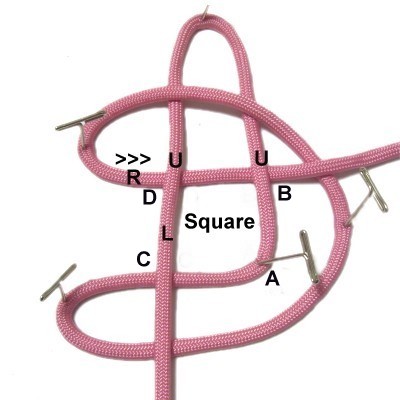
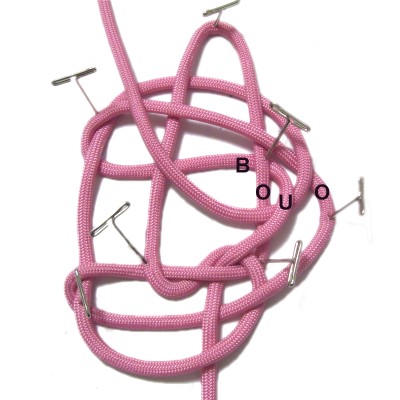
Step 2, continued:The bights and the curved area of the
Plafond knot should now look like a horseshoe
shape. Those areas are referred to as the
"outer segments" in some of the steps below.
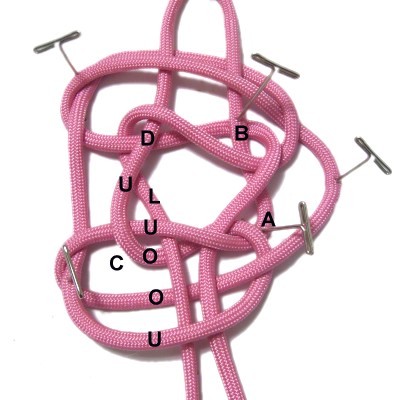
In the center area is a square. Mentally
label the four corners A - D as shown in the image
above. When you weave around the corners in
the following steps, leave some space between the
curved areas.
Fold the right half
of the cord over
the vertical segment between corners B and
A.
Pass it under
the horizontal segment between corners
A and C, arranged
vertically. Pass it over
the outer segment of the horseshoe.
Leave some space
at corners
A and B.
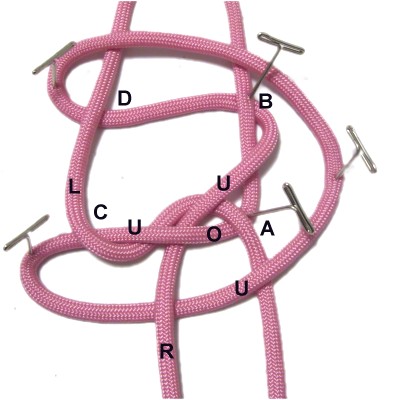
Step
3: Move the LEFT half of
the cord under
the horizontal segment between corners
A and C.
Bend it to the right and pass it through
the space at corner
A,under
- over the two segments.
Pass it under
the outer segment of the horseshoe.
Step
4: Curve the left
half of the cord to the left in
front of the outer segment, then pass it over
the right half of the cord.
Move it through the bights over
- under, heading backward
vertically. Push it as far to the
left as possible, so there is space next
to corners
C and D.
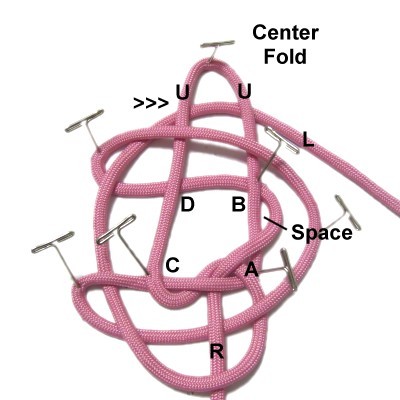
Move the left half
of the cord to the right, passing it under
both halves horizontally near the center
fold.
Adjust the
cords at corner
B so there is space between the
two segments.
Step
5: Move the
left half of the cord over
the outer segment of the horseshoe next to
corner
B.
Move it through the space at corner B
heading right to left, passing under
- over the two segments.
Step
6: Move the left
half of the cord to the left
diagonally, passing it over
both segments at corner
D where they cross.
Pass it under
the segment to the left of corner D,
heading forward vertically.
Adjust corner
C to make a space for the next
step.
Step
7: Move the left half of
the cord under
the vertical segment between corners
D and C.
Pass it through the space at corner
C, under
- over the two segments.
Pass it over
the outer segment of the horseshoe and under
the segment in front of it.
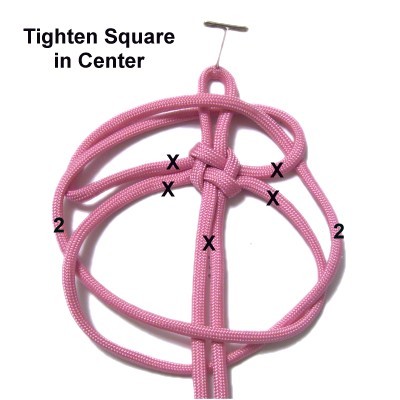
Step 8: Tightening the Plafond Knot is
challenging. You MUST keep the center fold
secured at all times, since the rest will become
very loose once you get started. You
can see this in the image below.
The center of the knot is tightened first:
Step
8: Pull the four segments
coming off the square in the center.
They are marked with an X in this
image.
Try to pull them at the same
time. Pull the two ends as
well, but NOT the loop at the top.
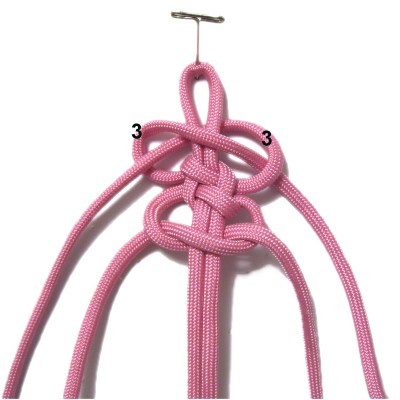
Step
9: Pull the segments marked
with a 2 in the previous
image. That will tighten the areas
adjacent to the square in the center.
Then tighten the remainder
gradually. The best areas to work
towards are marked
with a 3, since they lead to the
ends of the cord.
This is the
completed Plafond Knot.
By
using any text or images on Free Macrame
Patterns, you are agreeing to ourTerms
of Use