|
|
| |
 |
| |
| |
|
|
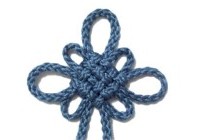
Description: The Mystic Knot
is also known as the Pan Chang Knot.
It represents the endless cycle of nature.
There is a closely woven diamond design in the
center. Surrounding it are three loops and
four folded segments.
This traditional knot is one of the most highly
used techniques in Chinese Macrame. It is
also the most complex. Practice it several
times, until you can make it without the
instructions.
I recommend you use material that is flexible,
which makes tightening easier. Size 2mm or
4mm will give you more room to work. Make
the knot at least 4
inches in length the first time you
practice it.
You can use this knot in a variety of Macrame
projects. Try it as a pendant, a focal
knot for a bracelet or belt, or even a clasp for
a purse.
|
|
|
| |
|
|
|
|
|
|
|
|
|
|
|
|
|
|
|
|
|
|
|
|
|
|
Key to images
and text:
- Narrow Bights -- Labeled with numbers and
small pins. These form the woven portion
at the center of the knot.
- Loops and wide folded segments -- Labeled
with letters and large pins. These are
outside the center area.
- Yellow Pins -- Marked bights 3 and 4
- Forward -- Toward the front of the board
- Backward -- Toward the back of the board
|
|
|
|
|
|
|
|
|
|
|
|
|
|
|
|
|
|
|
|
Step 1:
You need one cord at least 90
inches long to make the Mystic
Knot.
I recommend you make it 4 inches long the first
time, so you have room to work. Reduce the size
and use a 72-inch cord after you have practiced a
few times.
|
|
|
|
|
|
|
|
|
|
|
|
|
|
|
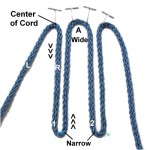
Step 1: Secure the
center of the cord to your board on your
left.
Move the right
half of the cord forward 4
inches, fold it to form a bight, then
bring it backward. Fold it again,
then repeat.
|
|
| |
|
|
|
|
|
|
|
|
|
|
|
|
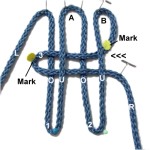
Step 1,
continued: Mentally label the bights
1 and 2. Adjust the width so they are
both narrow,
since they form part of the diamond shape in the
center of the Mystic Knot.
Between them is a wide folded segment. It
should be at least 1-inch wide.
Mentally label it segment
A.
|
|
|
|
|
|
|
|
|
|
|
|
|
|
|
Step
2: Move the right half of the
cord clockwise
to form a loop. Then
fold it to make bight
3.
Pass the new bight under
- over bight 2, heading left horizontally.
Then do the same through bight 1.
Secure it with a different type of pin, or
mark it in some way.
|
|
| |
|
|
|
|
|
|
|
|
|
|
|
|
Step 2,
continued: Mentally label the loop segment
B.
The bight should rest at the half way point
between segment A and the folded area of bights 1
and 2. |
|
|
|
|
|
|
|
|
|
|
|
|
|
|
|
|
|
|
|
|
|
Fold the right
half of the cord to make bight
4. Pass it through
bights 2 and 1 under
- over, heading left
horizontally.
Arrange it close to the fold
of bights 1 and 2. Secure and
mark it as you did for bight 3. |
|
|
|
|
|
|
|
|
|
|
|
|
|
|
|
Step 2,
continued: This will create
another wide area on the right, which should be
labeled segment
C.
You will no longer use the right half of the
cord. Secure it next to bight
2, and mark it like bights 3 and 4.
The purpose for marking these segments is so you
can identify them easily when you do the weaving
in step 5. |
|
|
|
|
|
|
|
|
|
|
|
|
|
|
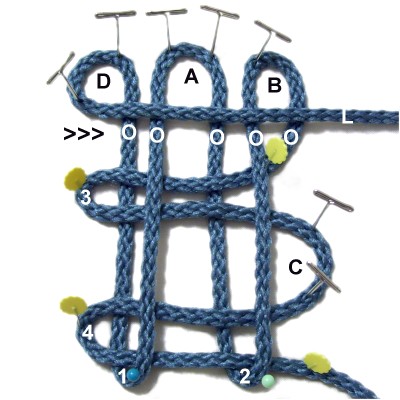
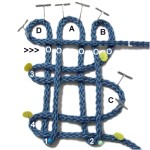
Step
3: Make a counter-clockwise
loop with the left
half of the cord, mentally
labeling it segment D.
Pass it over
everything as you move it horizontally
toward segment B.
|
|
| |
|
|
|
|
|
| |
|
|
Fold the left half
of the cord, then move it under
everything as you bring it back to the
left.
Mentally label it bight
5.
Make
sure bights 2 and 3 are narrow, so
there is space between them for the
next step.
|
|
|
|
|
|
|
|
|
|
|
|
|
|
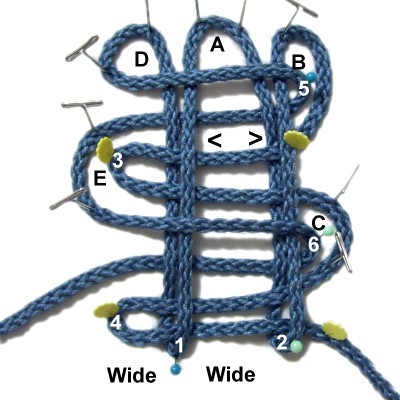
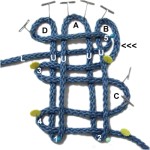
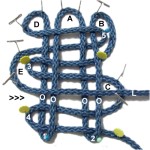
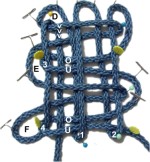
Step
4: Move the left
half around bight
3, and mentally label it segment
E.
Pass it over
everything as you bring it horizontally
toward segment
C .
Make sure this takes place between
bights 3 and 4.
|
|
| |
|
|
|
|
|
|
|
Fold the left half
of the cord to make bight
6, then pass it under
everything as you move it back to the
left.
|
|
| |
|
|
|
|
|
|
|
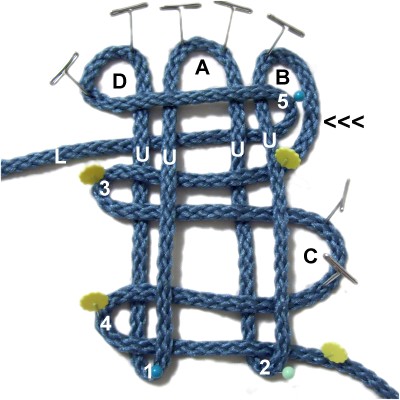
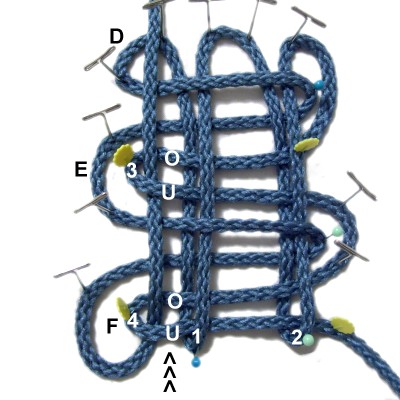
Before
completing the Mystic Knot, you must first
make some room for the weaving.
Make
bights 1 and 2 as narrow as
possible, so the areas to the right and
left of bight
1 are wider.
Make sure you can easily recognize bights
3 and 4, which you marked for
that purpose. |
|
| |
|
|
|
|
|
|
|
|
|
|
|
|
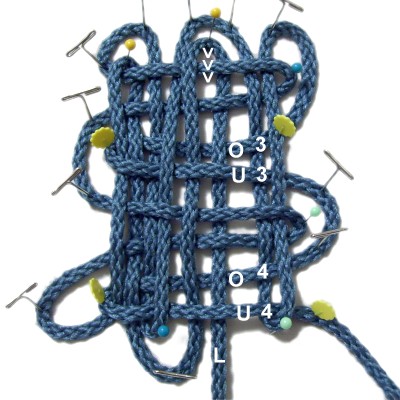
Designer's
Tip: It's important that you
understand the concept with the weaving you will
do next.
For that reason, I labeled the under
- over sequence for bights
3 and 4 only, so they are more obvious in
the following images.
You pass the cord either over or under all the
remaining segments, depending on which direction
you are moving. |
|
|
|
|
|
|
|
|
|
|
|
|
|
|
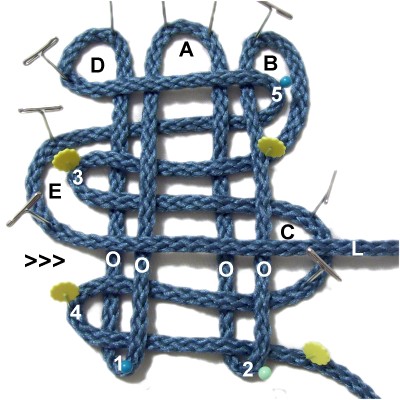
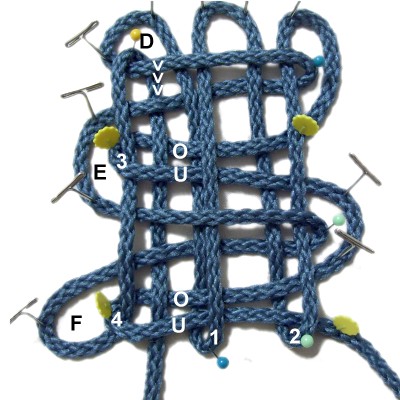
Step
5: Rotate the left half counter-clockwise
to form segment
F.
Heading backward
vertically, pass it over
all the segments except for the marked
bights (3 and 4), which are under
- over.
|
|
| |
|
|
|
|
|
|
|
|
|
|
|
|
Designer's
Tip: You can count the
segments starting from bight 4 all the way to
segment D.
You pass under
the 1st and 5th segments and over
the remainder. |
|
|
|
|
|
|
|
|
|
|
|
|
|
|
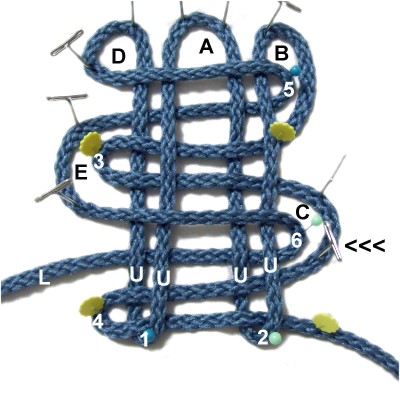
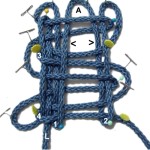
Now
you reverse direction, moving forward
through the knot.
Pass the left half under
all the segments except the marked
bights (3 and 4), which are over
- under.
|
|
|
|
|
|
|
|
|
|
|
|
|
|
|
|
|
|
|
Designer's
Tip: Counting from segment D
forward to bight 4, you pass the cord over
the 3rd and 7th segments and under
the remainder.
|
|
|
|
|
|
|
|
|
|
|
|
|
|
|
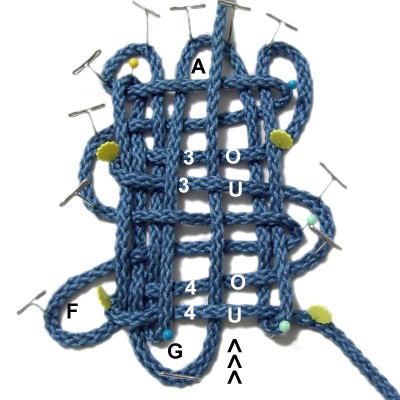
Make some room
by moving bights 1 and 2 to the right and
left, so you widen segment A.
The next row of vertical weaving for the
Mystic Knot takes place in that area.
|
|
|
|
|
|
|
|
|
|
|
|
|
|
|
|
|
|
|
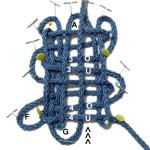
Step
6: Move the left half
around bight 1, forming segment G.
Weave it
toward segment A heading backward
vertically, passing it over
all the segments except bights
3 and 4.
You move it under
- over those two bights.
|
|
| |
|
|
|
|
|
|
|
|
|
|
|
|
Designer's
Tip: The weaving for step 6 is the
same as step 5.
The only difference is the location, which is
through the area you widened. |
|
|
|
|
|
|
|
|
|
|
|
|
|
|
Move the left
half forward through the knot, passing it
under
all the segments except bights
3 and 4.
You move it over
- under those two bights.
|
|
| |
|
|
|
|
|
|
|
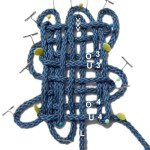
Step
7: Remove the pins from all
the bights,
which form the center of the Mystic Knot.
Leave pins on segments
A - G.
Remove some of the slack starting at
segment D and moving both
directions. Make sure nothing is
twisted.
|
|
| |
|
|
|
|
|

|
|
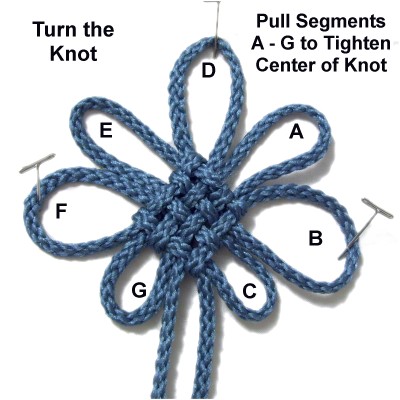
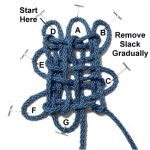
Turn
the knot so the two ends of the cord
are vertical, and the loops are
arranged as shown.
Pull each segment to tighten the
center most of the way. Remove
slack from each loop gradually.
Keep working until you like the shape,
then tighten the center completely.
|
|
| |
| |
|
|
|
|
|
|
|
|
|
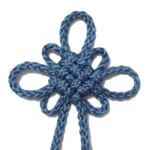
The traditional
shape for the Mystic Knot is for segments
D, F, and B to be larger than the other
segments.
You can make all the loops the same size
if you want a flower. |
|
|
|
|
|
|
|
|
|
|
|
|
|
|
|
|
|
|
By
using any text or images on Free
Macrame Patterns, you are agreeing to
our Terms of
Use
|
|
|
|
|
|
|
Have
any comments about the Mystic Knot? Contact
Me.
|
|
|
|
|
|
|
|
|
|
|
|
|
|
|
|
|
|
|
|

|
|
|
|
|
|
|
|
|
|
|
|
|
| |