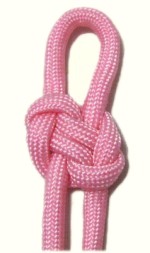
Kinky Lovers Knot
|
| |
| |
|
|
Description:
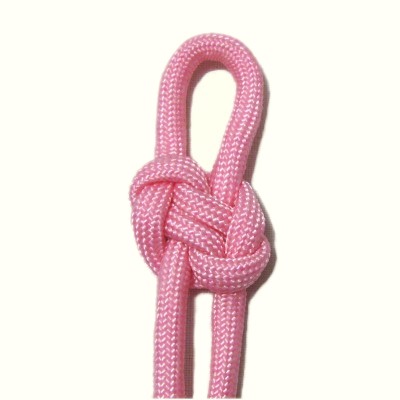
The Kinky Lovers Knot is a unique
historical knot suitable for many types
of Macrame projects.
It's sometimes called the Double Figure
Eight knot.
You can use this decorative knot to
make a simple necklace, by adjusting the
loop at the top so it's large enough to
fit over your head.
Since this knot has a loop, you can use
it as a clasp for a bracelet or belt.
|
|
| |
|
| |
|
I found this knot in Decorative
Fusion Knots written
by JD of Tying it All
Together.
Visit his website by clicking on the
link or image.
The video
gallery contains tutorials for
a variety of very unique and appealing
designs.
|
|

|
|
| |
|
|
|
| Step 1:
To practice, you need one cord, at least 20 inches
long. |
|
| |
| |

|
|
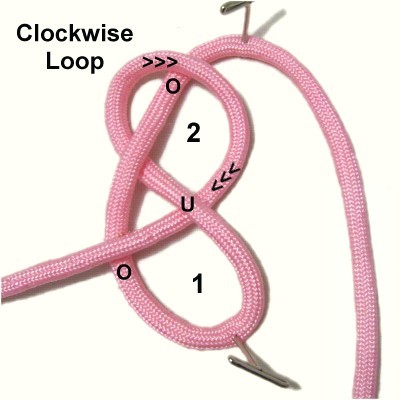
Step 1: Fold a cord in
half and secure it at the center.
Make a counter-clockwise
loop with the left
half of the cord.
Pass it under
the vertical segment to make the
crossing point on the left.
Mentally label it loop
1.
|
|
| |
|
| |

|
|
Step 2: Move the left
half to the right to make a clockwise
loop, passing over
the vertical segment near the center of
the cord.
This creates loop
2 of the Figure 8 knot.
Bring it down to the first loop, and
pass it through under
- over (from
below). Secure the
cord on the left.
|
|
|
|
|
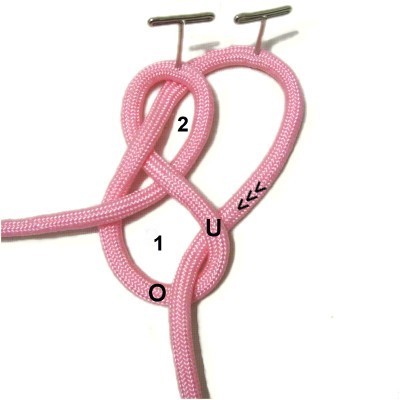
Designer's
Tip: Now is a good time to
reduce the size of the Kinky Lovers knot. Don't
tighten it too much, since you need room for the
other steps.
Try to keep loop
2 close to the center of the cord.
The Figure 8 knot should be vertical.
|
|
|
| |

|
|
Step 3: Pass the right half
of the cord through loop
1 under
- over (from below).
This links the lower loops of the two
Figure 8 knots.
|
|
| |
|
|
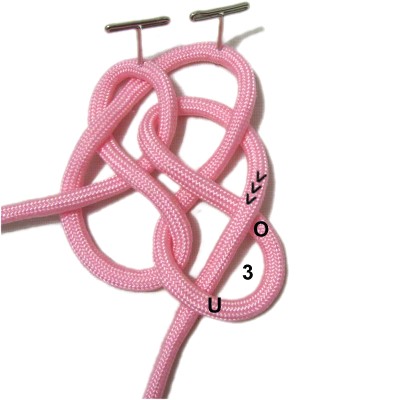
Designer's
Tip: Make sure you can clearly see
both loops of the Figure 8 on the left, especially
loop
2.
In the image above, loop 2 was a little narrow, so
it was adjusted. |
|
|
| |

|
|
Step 4: Rotate the
right half
of the cord to the left to start loop
3.
Pass over the vertical segment (right
half) to complete the loop.
Pass the cord through loop
2 over
- under. Bring it to the
right, passing it under
the vertical segment.
|
|
| |
|
| |

|
|
Step 5: To complete
the Figure 8 Knot on the right, bring
the right
half of the cord through loop 3
from the top (over
- under).
|
|
| |
|
| |
|
|
Step
6: Tighten the Kinky
Lovers Knot slowly. Try not to pull
on the secured portion at the top, or the
loop will become too large.
Keeping the center area secured while you
tighten the Figure 8 Knots is very
helpful. |
|
| |
| |
|
|
|
By using any text
or images on Free Macrame Patterns, you are
agreeing to our Terms of Use
|
|
|
| |
|
Have
any comments about the Kinky Lovers Knot? Contact
Me.
|
|
|
|

|
|
| |