|
|
| |
|
|
|
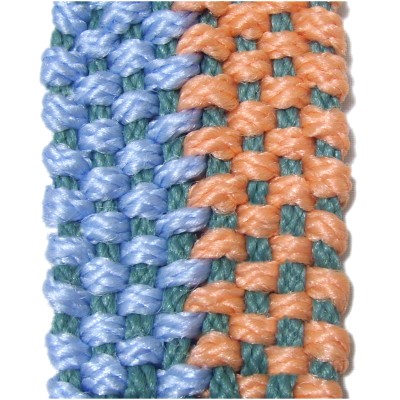
Description:
The Interlocking Weave is a technique sometimes
used to make baskets. It can also be used to
make belts, place mats, rugs and more.
The design is similar to the Tabby
Weave, where you use one working cord,
weaving back and forth to create the
pattern. In this case, you have two working
cords that link in the center, which is what makes
it so unique.
By changing the number and length of the vertical
holding cords, you can make this design any
size. |
| |
| |
| |
| |
Preparation:
To practice, you need 8 holding cords at least 18
inches long.
You also need 2 working cords, at least 36 inches
long.
When using the Interlocking Weave in a Macrame
project, you will need an even number of holding
cords (6, 8, 10, 12, etc). Use the
formula below to determine the length of the
working cords:
First, determine the finished width and length you
are aiming for. Add the two sizes together
(in inches), then multiply the result by 6.
Cut the working cords to that length.
For example: A panel 2 inches wide + 4
inches tall = total of 6 inches. Multiply by
6, which is 36 inches (1 yard). |
| |
|
|
|
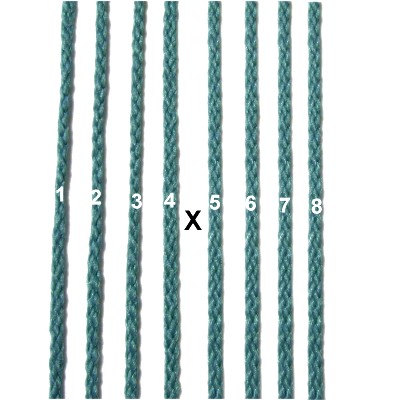
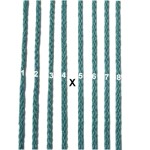
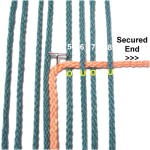
Step
1: Secure the 8 holding
cords to your board vertically.
STRETCH them so they have as much
tension as possible.
Mentally number the cords. The X in
this image is the area where the two
working cords will be linked.
|
|
| |
|
|
|
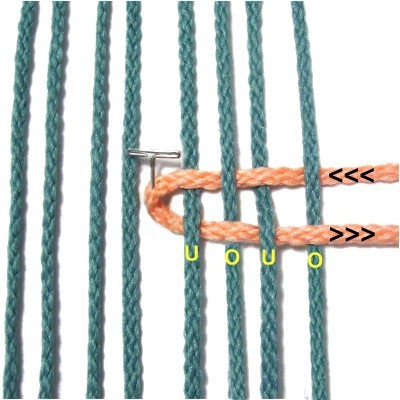
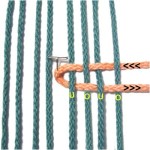
Step
2: Secure the first working
cord to the right of holding cord 8,
arranged horizontally.
Weave it through cords 8 - 5 (right to
left), passing under
cords 8 and 6, and over
cords 7 and 5.
Secure the cord in the space between cords
4 and 5. |
|
| |
|
|
|
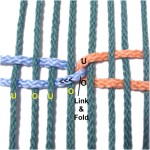
Step
3: FOLD the cord where it's
secured, then weave it through cords 5 - 8
left to right.
Pass under
cords 5 and 7 and over
cords 6 and 8, which is the opposite of
step 2.
Read
important information below.
|
|
| |
| |
| |
|
|
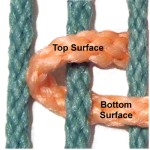
The term FOLD
means that you start out with the top
surface of the working cord face up.
After you curve it around the holding
cord, you turn it upside
down so the bottom surface that
was touching the board is face up. |
|
| |
|
| |
|
|
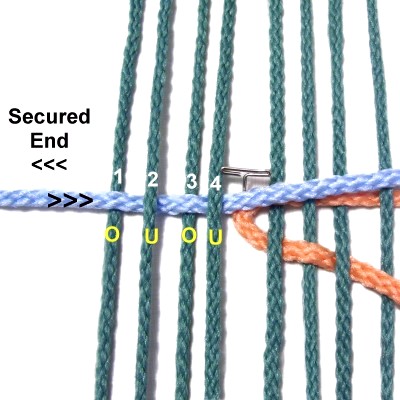
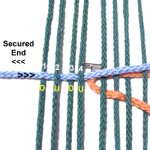
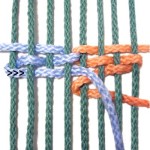
Step
4: Secure the second
working cord to the left of holding cord
1, arranged horizontally.
Weave it through cords 1 - 4 heading left
to right. Pass it over
cords 1 and 3, and under
cords 2 and 4.
|
|
| |
|
| |
|
|
Step
5: Pass working cord 2
through the folded area of cord 1,
passing under
- over the two parts.
Fold the cord, then weave it back to
the left, passing over
cords 4 and 2, and under
cords 3 and 1.
|
|
| |
|
|

|
|
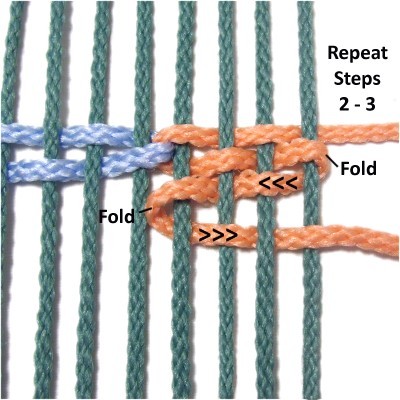
Step
6: Repeat
step 2,
folding the right working cord
around holding
cord 8 before you do the
weaving.
Repeat
step 3, folding it again as you
weave it back to the right.
|
|
| |
|
|
|
|
Step
7: Repeat
step 4, folding the left working
cord around holding cord 1 before weaving.
|
|
|
|

|
|
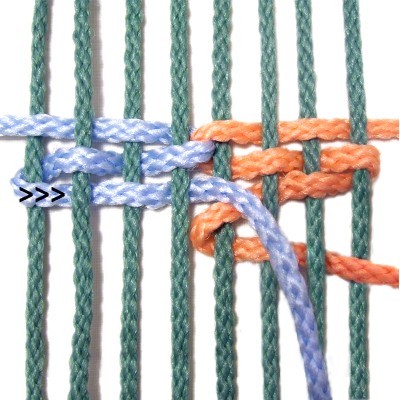
Step
8: Repeat
step 5.
This is a good time to tighten the weaving
if you need to do so, pushing the rows
close together (see image below). |
|
| |
|
| |

|
|
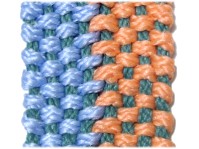
Repeat
steps 6 - 8 several times, to
make the Interlocking Weave panel longer.
|
|
| |
| |
|
|
| By using any
text or images on Free Macrame Patterns, you are
agreeing to our Terms of Use |
|
|
|
| Have
any comments about the Interlocking Weave? Contact
Me. |
|
|
|

|
|
|