Description:
TheseDouble
Spirals are unique 2-color designs featuring the
Spiral Stitch, also called the Half Knot Spiral.
Because there are two sets of working cords, these
sennits are thicker than the regular Spiral
Stitch. For that reason, they are GREAT for
the long posts in plant hangers and hanging
tables.
When practicing, you need two contrasting colors,
and it's helpful if you use a third color for the
fillers. Make sure you use a project board
and pins.
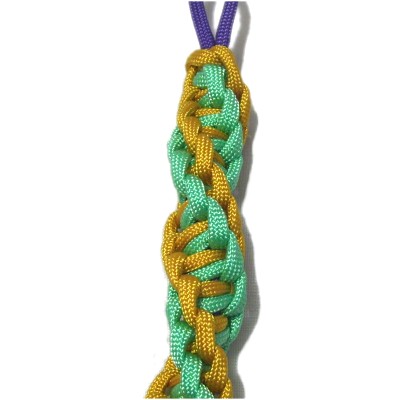
Double Half Knot Spiral
The Double Half Knot Spiral features two cords
that twist in the same
direction, so is the easiest to
make.
To practice, you need two 36-inch working cords
and one 25-inch filler cord.
Since you will be folding the cords in half, there
will be a loop at the top that can be used for a
clasp.
To make Double Spirals starting at the center, you
need 6 individual cords.
Step
1: Fold the filler cord in
half and secure it to your board
vertically.
Fold working
cord A and place it under the
fillers, securing it vertically, too.
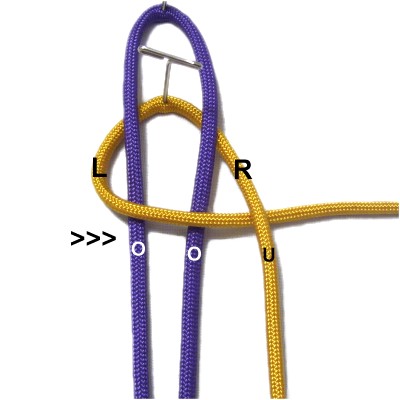
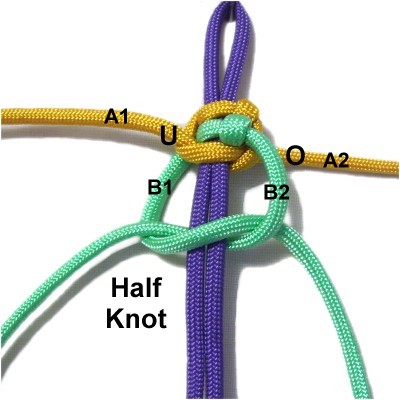
Step
2: To start the Half Knot,
move the lefthalf
of the working cord to the right.
Pass it over
the fillers and under
the right
half of the working cord.
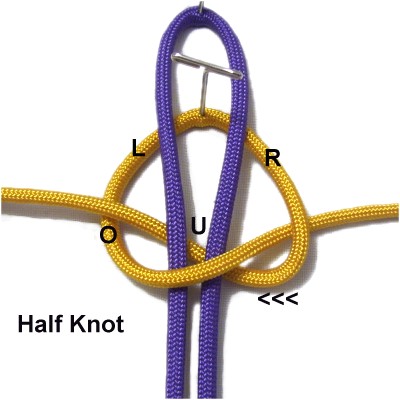
To complete
the Half Knot, move the
right half of the working cord to
the left.
Pass it under
the fillers and over
the left half of the cord.
Pull both halves to tighten the knot, then
arrange them horizontally.
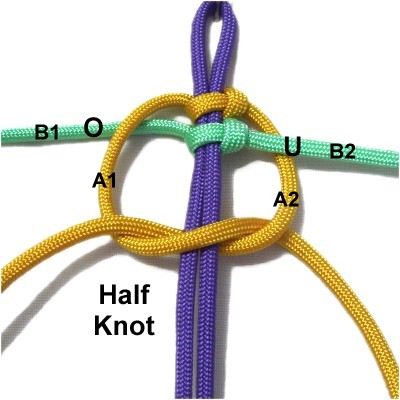
Step
3: Repeat
step 2 with working cord B.
Arrange the two halves horizontally when
you are done.
Mentally label the two halves of each cord
as shown.
Important:
The two
halves are labeled as if they are separate
cords. They change places after each
knot is tied, which gets confusing.
So mentally re-label
them at the beginning of each step, so Cords
A1 and B1 are always on the LEFT.
Step
4: On the left, move Cord
A1 over
Cord B1.
On the right, move Cord A2 under
Cord B2.
Repeat
step 2, tying a Half
Knot with Cord A.
Arrange the two halves horizontally.
Designer's
Tip: The most important part of
making Double Spirals is to keep the over
- under pattern consistent.
You will be able to see those details more easily
if you always arrange both halves of the cord
horizontally after tying the knot.
Step
5: Mentally re-label both
cords.
On the left, move Cord B1 under
Cord A1.
On the right, move Cord B2 over
Cord A2.
Repeat
step 2, tying the Half Knot with
Cord B.
Step 6:
Repeat steps 4 and 5 several
times.
Eventually, the knots will spiral.
It's important to hold the filler cords in
the same position, even if you need to
twist the Half Knots as you
progress. In other words, do
not tie the knots sideways!
Double Alternating Spiral
The Double Spirals you are learning include this
unique variation. This design features two
cords that twist in opposite
directions.
You tie rightHalf Knots
with one working cord, and leftHalf Knots
with the other.
Pay close attention to the over
- under pattern of the cords, since it's
very easy to get lost when the sennit
twists.
You need one filler cord, at least 25 inches
long. The two working cords should be at
least 45 inches long.
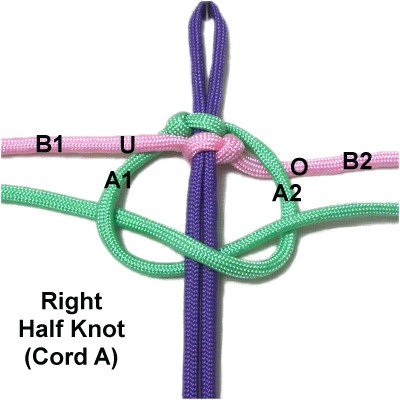
Step
1: Fold the filler cord in
half and secure it. Place workingCord
Aunderneath it. Match
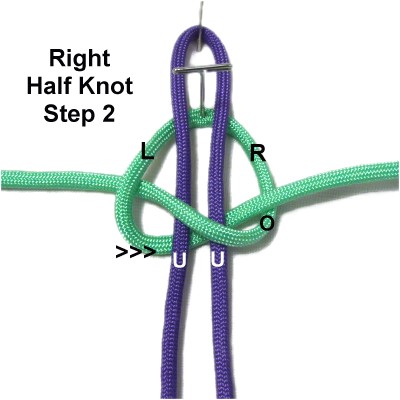
the ends and balance the cord.
To start the RIGHT Half Knot, move the
right half of Cord A to the left,
over
the fillers and under
the left half.
To complete
the right Half knot, move the left
half of Cord A under
the fillers, heading right.
As you pull it out on the right, pass over
the right half.
Tighten the knot firmly, and move the two
halves to the right and left horizontally.
Important:
Double Spirals MUST
be consistent, or the design won't work out.
When usingCord A
you always tie RIGHTHalf Knots,repeating step 1.
When
usingCord B
you always tie LEFT Half Knots, repeating
step 2
(below).
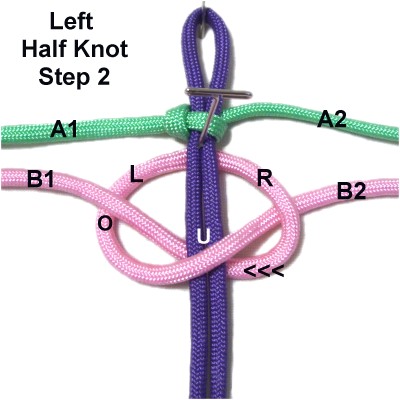
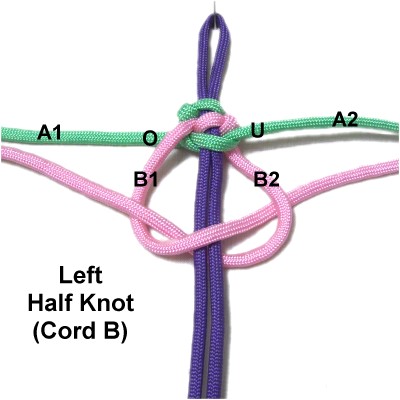
Step
2: Arrange Cord
B under the fillers, matching the
ends to balance it.
Start the LEFT Half Knot by moving the lefthalf
of Cord B overthe fillers and under
the right half.
Complete the
left Half Knot by moving the right
half of Cord B under
the fillers and over
the left half.
Tighten the knot, then move the two halves
so they are horizontal. Mentally
label the four segments as shown.
Designer's
Tip: Both Double Spirals
have similar issues in that it's a challenge to
keep the two halves of each cord identified, since
they switch places often.
So mentally re-label before each step, so that A1
and B1 are always the segments currently on the
left.
Step
3: On the left, pass Cord
A1 under
Cord B1.
On the right, pass Cord A2 over
Cord B2.
Repeat
step 1, tying a RIGHT Half Knot
with Cord
A. Arrange the two cords
horizontally.
Step
4: Mentally re-label
the two halves of both cords.
On the left, pass Cord B1 over Cord A1. On
the right, pass Cord B2 under Cord B2.
Repeat
step 2,tying
a LEFT Half Knot with Cord
B.
Step
5: Repeat
steps 3 and 4several
timesto
continue building the sennit, since Double
Spirals look best if they are long.
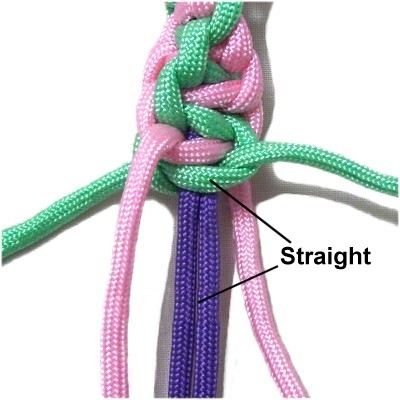
As the sennit twists, it's VERY IMPORTANT
that you keep the cords straight as you
get ready to tie the Half Knot. Never
tie the knots sideways.
Designer's
Tip: You know the knot is straight
when the working cords come out of it
horizontally, as shown in the image above and
below.
The filler cords should rest flat on your board
without twisting.
Here
you can see again that the filler cord and
working cord are both straight prior to
tying the knot.
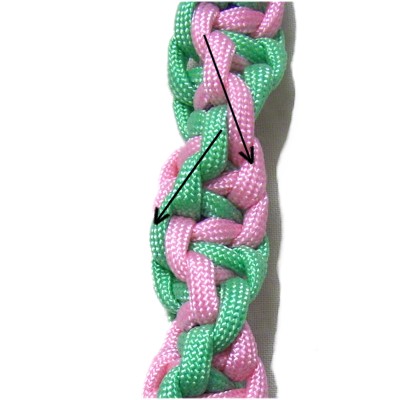
The previous cord may be slightly
twisted. That's fine, as long as the
current
knot is straight.
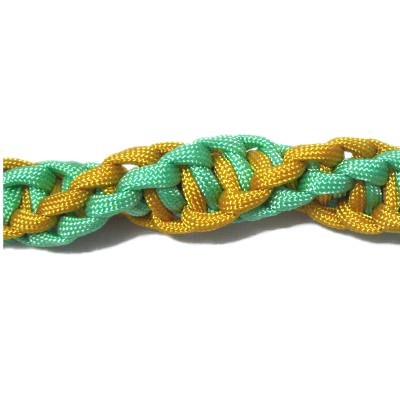
As you
continue, you will see the two spirals
heading in opposite directions (arrows).
You will also see that this variation of
the Double Spirals has four surfaces
(front, back, 2 sides).
By
using any text or images on Free Macrame
Patterns, you are agreeing to ourTerms
of Use