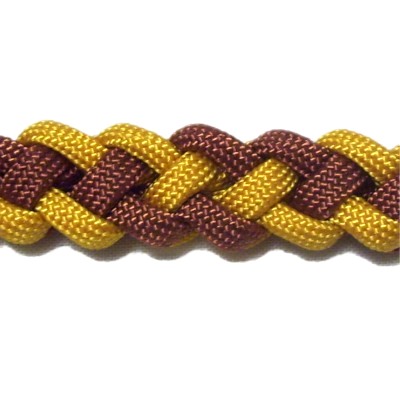
Description: The Coyote Trail
looks like a braid, but is more elaborate. Make
sure you use two contrasting colors to see the
alternating pattern.
This design can be used to make a variety of
Macrame projects, such as belts, pet collars and
leashes, Paracord bracelets, and more. Try
using this technique for the long posts in plant
hangers and tables.
A loop can be formed at the top, if you need a
clasp.
Children and beginners should be able to create
small items with this knot, so it's a good
choice for group activities.
Look through the video
gallery for other interesting
knotting techniques and designs.
Connecting the Cords
The
following instructions show you how to connect the
two cords to start the Coyote Trail.
Other techniques can be used, but it's important
that the four segments are arranged so both halves
of each cord rest side-by-side, like the image in
step E.
Preparation:
Cut two cords, at least 45 inches long to practice
the Coyote Trail.
When using this technique in a project, cut the
cords 7
x the finished length you plan to make.
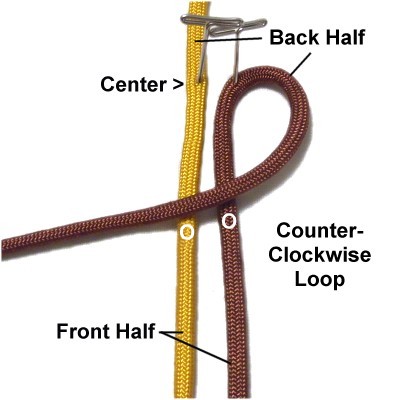
In the images, cord
A is gold and cord
B is brown.
Step
A: Place the cords on your
board vertically, and secure them at the
center.
Cord
A should be on the left.
Make a clockwise
loop with the back half
of cord
B, passing over
both cords.
Designer's
Tip: The terms back and front (or
backward and forward) can be confusing, since most
people tie knots with the board flat rather than
upright.
Front or Forward
= closer to the front of your board.
Back or Backward
= closer to the back of your board.
Step B: Bring cord
Aover
cord B on the left, then under
it further to the right. Pass it under
the front half of both cords.
Pull it out on the right, passing over
cord B.
Tighten slightly to remove most of the
slack.
Step C: Turn cord
A to the left, then pass it
into the left loop from the top (over
- under).
You can tighten it slightly, so it
looks like the image below.
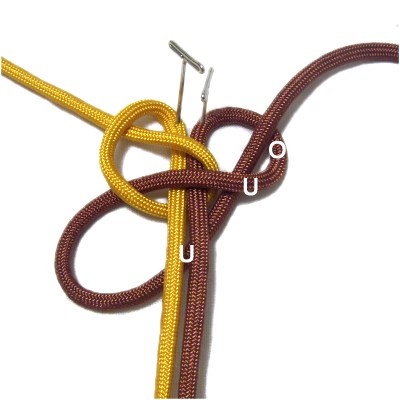
Step D: Bring the back
half of cord
Bunder
the front portion of both cords.
Then pass it through the loop on the
right from below (under
- over).
Step
E: Tighten the knot gradually
until it's firm.
Identify the segment shown, and pull it
backward if you need a loop for a clasp
(see next image).
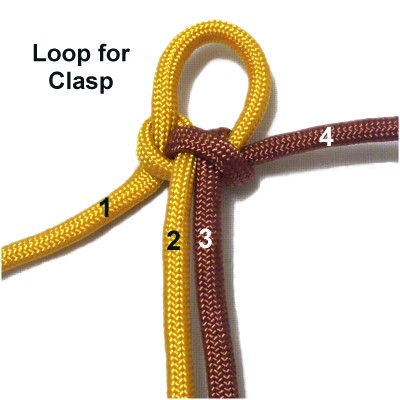
Step
F: The size of the loop
should be at least 1/2 to 3/4 inches in
size, depending on which knot you plan to
tie at the other end.
Mentally the four segments as if they were
four separate cords.
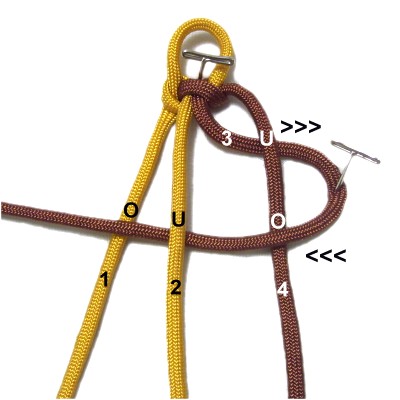
Coyote Trail Design
Step 1: Move cord
3 to the right, passing it undercord 4.
Curve it back to the left,then
pass it over
cord 4, under
cord 2, and over
cord 1.
Secure
it at the curve.
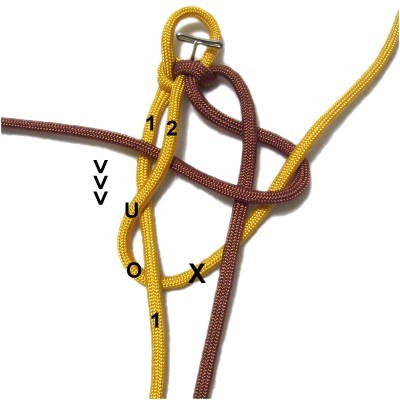
Step 2: Move cord
2under
cord 4 as you bring it to the right.
Pass it under
- over cord 3 at the curve,
heading toward the back of your board.
Leave a little slack so you can clearly
see the segment marked with the X.
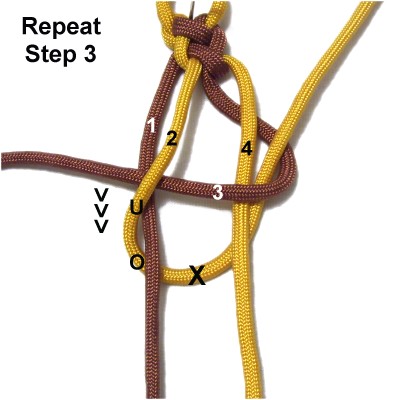
Step
3: Move cord
1under
- over cord 2 in the area where
it curves (X).
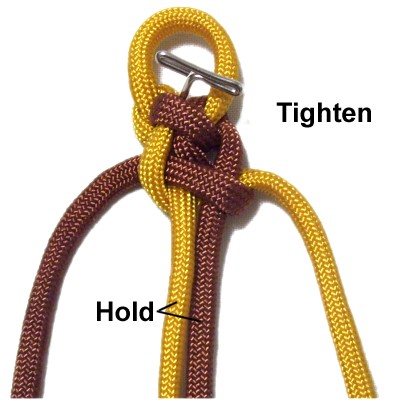
Step
4: Tighten the knot by
holding cords 1 and 4 steady in a vertical
position.
Then tighten cords 2 and 3 until the knot
is firm.
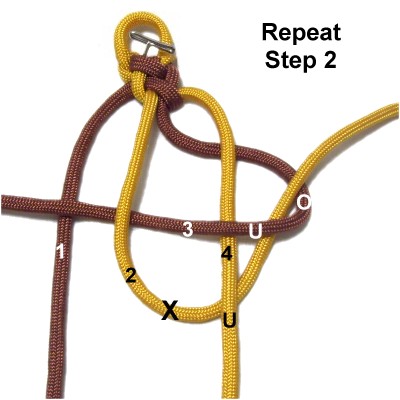
Step
5: Mentally re-number the
cords in their new arrangement, since they
have moved.
Repeat
step 1.
Step
6: Repeat
step 2.
Make sure you identify the curved area of
cord 2 marked with the X in this image.
Step
7: Repeat
steps 3 and 4.
Step
8:Repeat
steps 5 - 7 at least two more
times if you are practicing
the Coyote Trail.
When making something with this technique,
you would continue until the size is close
to the finished length. You still
have one more knot to tie (next step).
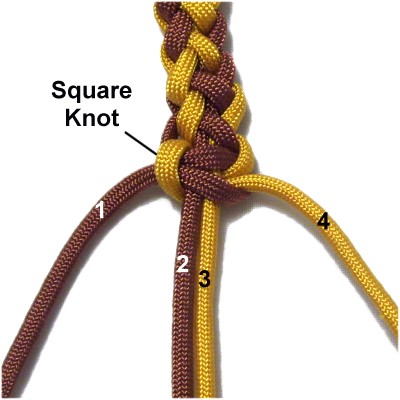
Step 9: To finish the
Coyote Trail, use the cords in the 1 and
4 positions to tie a Square Knot around
the other two cords. Finish them off in
the BACK of the design.
Cords 2 and 3 can now be used to tie a
button knot for a clasp, or to attach a
button or bead.
By
using any text or images on Free Macrame
Patterns, you are agreeing to ourTerms
of Use