|
|
| |
|
|
|
|
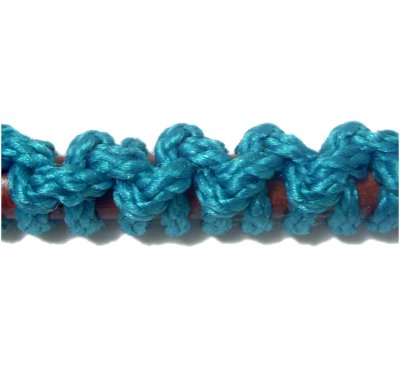
Description: The Cockscomb
knot, also know as Ringbolt
Hitching, is an interesting
decorative knot seldom seen anymore.
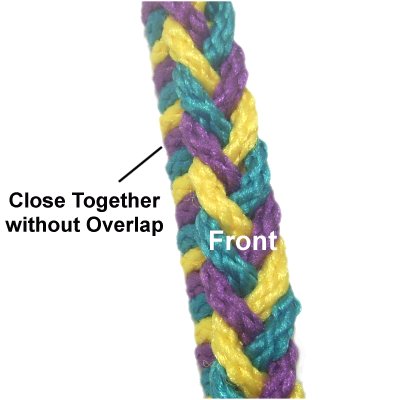
The front of the knot is a braided design that
stands out from the front surface of the item
holding the knot. The remainder wraps
around the item, completely covering it.
Since it has to be tied onto something, you
could use this technique to decorate bottles, to
cover a dowel or tube, or to wrap a thick bundle
of cords together.
The primary knots used are Half Hitches, but
they are arranged in a unique way. The crossed
elements are important, so pay close attention
to the instructions and images shown below.
Two variations are also described on this page.
They feature loops rather than braiding:
|
| |
| |
|
|

|
|
Cockscomb Knot
|
|

|
|
|
To practice the Cockscomb Knot, you need three
cords at least 36 inches long. You will also
need a 12-inch dowel or paper tube to hold the
cords.
Secure the cords at the top
of the dowel, so they rest side-by-side. You can
use rubber bands or tape to hold them in place.
Arrange them vertically on your board or work
surface.
Mentally number the three cords (left to
right). Label each cord by applying tape
with the number written on it. Using
three colors is another option.
Place a small rubber band or tape at the spot
where you want to start the design.
Usually that will be close to one end of the
item being wrapped.
|
| |
|
|
|
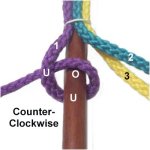
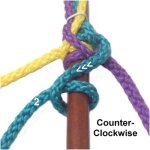
Step
1: Use cord
1 to tie a counter-clockwise
Half Hitch, passing under-over
the dowel or tube and under
the cord.
The cord should be heading left
when you are through. Tighten the
knot firmly,
sliding it
up to the small rubber band marking
the starting point.
|
|
| |
|
|
Designer's
Tip: ALL the Half Hitches in the
Cockscomb Knot are tied as described above (under - over -
under).
This is sometimes called a Reverse Half Hitch,
especially in vintage patterns. |
|
| |
| |
|
|
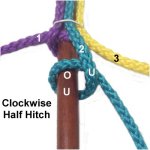
Step
2: Move cord 2 down below
the previous knot.
Make
a reverse Half Hitch in a clockwise
direction, so the cord is heading right
when you are finished.
Tighten firmly. |
|
|
|
|
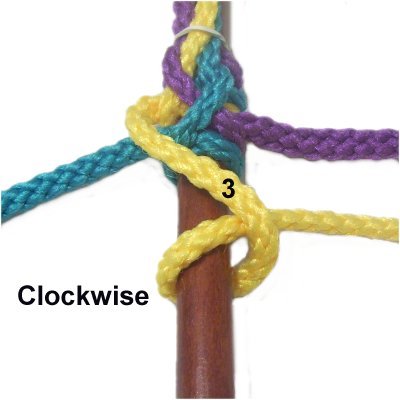
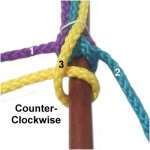
Step
3: Make the next Half Hitch with
cord
3, in a
counter-clockwise
direction.
Allow it to cross over cord 2 in the area
above the knot.
Slide it up next to the others, and
tighten it firmly.
|
|
|
| |
|
|
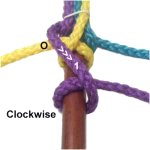
Step
4: Pull cord
1 towards the right,
passing over cord 3. It should cross
over the top of the dowel diagonally
(white arrows).
Tie the Half Hitch in a clockwise
direction.
Tighten firmly and push all the
knots close together. |
|
|
| |
|
|
Step
5: Pull cord
2 to the left,
passing over
cord 1. It should cross over the top
of the dowel diagonally.
Tie the Half Hitch in a counter-clockwise
direction. |
|
| |
|
|
Have you figured out the concept for the
Cockscomb Knot? You use the cords in order
(1 - 2- 3), and alternate the direction the Half
Hitches are tied.
The most important part to this design is to
always cross over the dowel prior to tying the
knot. |
|
| |
| |

|
|
Step
6: Move cord
3 over
cord 2, as you pull it to the right.
Tie a clockwise
Half Hitch after crossing the cord
diagonally over the top of the dowel.
|
|
| |
|
|

|
|
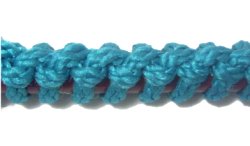
Step
7: Repeat
steps 1 - 6 at least one more
time, to complete the Cockscomb Knot.
Make sure the cords wrap around the dowel
evenly, so the coils are close together
and do not overlap. |
|
|
|
|
|
|
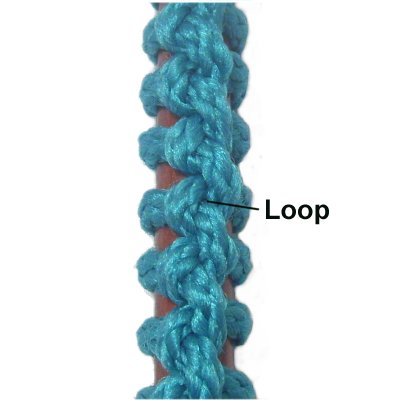
Loop Ringbolt Hitch
|
|
|
|
|
Now that you've practiced the Cockscomb Knot,
it's time to try a couple variations.
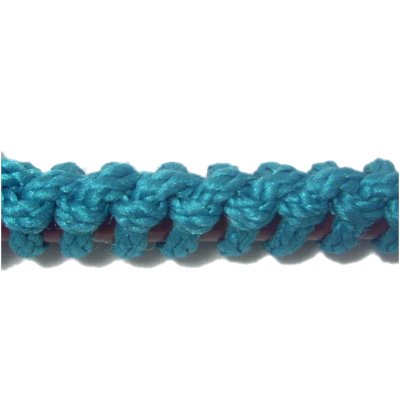
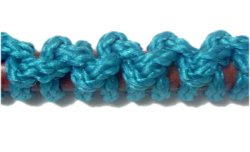
This design is called the Loop Ringbolt Hitch
because it's made with loops rather than
braiding.
This technique is easier to make than the regular
Cockscomb knot. The loops aren't raised up as much
as the braided form, so the design is more
subtle.
You may not be able to completely cover the item
holding the knots, since the loops in the front
create extra space between the coils in the back
and sides.
To practice, you need one cord, at least 45-inches
long. Secure one end to the top of a dowel
with a rubber band or tape. |
|
|
|
|
|
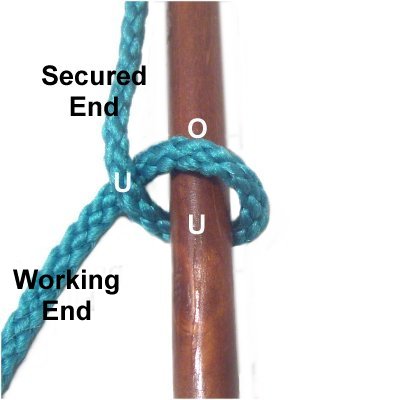
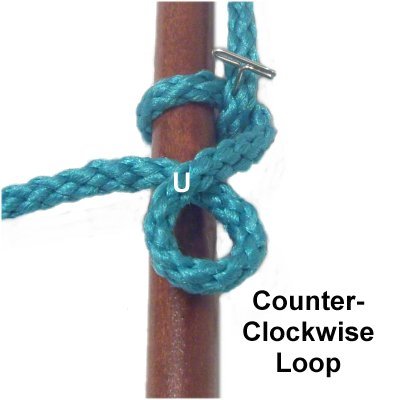
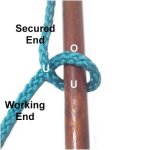
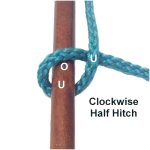
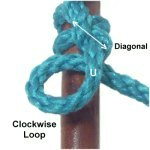
Step
1: To anchor the cord in
the area you want to start, tie a counter-clockwise
reverse Half Hitch:
Pass the working end under
- over the dowel, and under
the secured portion of the cord.
|
|
|
| |
|
|
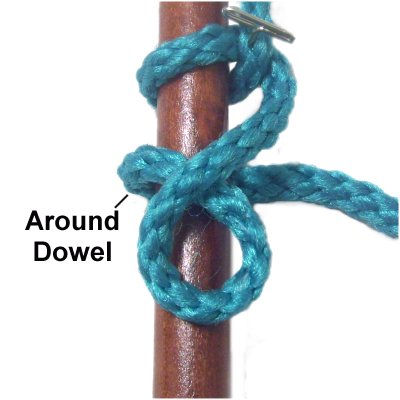
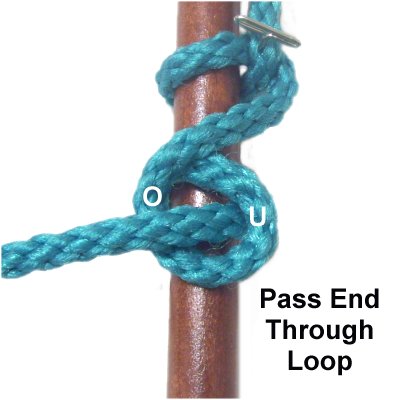
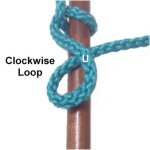
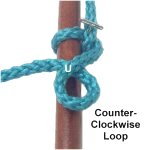
Step
2: Just below the Half
Hitch, make a clockwise
loop. Pass the working end under
to form the crossing point.
This loop should rest on the top surface
of the dowel or tube.
|
|
| |
|
| |
|
|
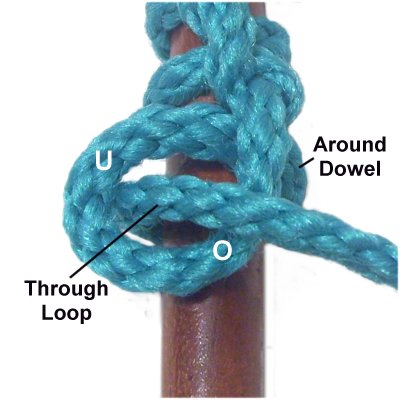
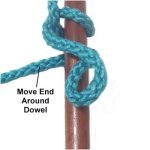
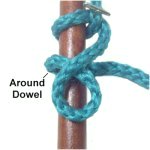
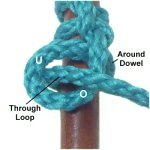
Step
3: Move the working end
around the dowel from right to left,
while holding the loop.
|
|
| |
|
|
|
|
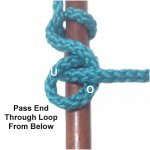
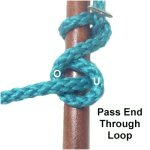
Step
4: Pass the working end
through the loop from below (under -
over).
Tighten slowly, removing the slack from
the loop first, followed by the
remainder.
The completed knot should be firm, but
not excessively tight.
|
|
| |
|
|
|
|
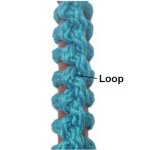
Step
5: Repeat
steps 2 - 4 several times,
completing this variation of the Cockscomb
knot.
Tighten all the knots the same so the
spacing is neat. |
|
|
|
| |
| |
| |
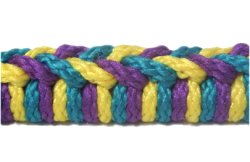
Zigzag Ringbolt Hitch
|
| |
 |
| |
| |
This variation of the
Cockscomb knot is similar to the Loop Ringbolt,
but the loops alternate direction and are tilted
to form a zigzag pattern.
Like the previous design, the loops may not allow
you to completely cover the item holding the
knots.
To practice this technique, you need one cord, at
least 60 inches long. Secure one end of it
to the top of a dowel with tape or a rubber band. |
|
|
|
|
|
Step
1: Tie a clockwise
reverse Half Hitch with the working end by
making a loop under
- over the dowel.
Pass under
the secured end to complete the loop. |
|
|
|
|
|
|
Step
2: Make a counter-clockwise
loop resting on top of the dowel.
Make sure you pass the working end under
to make the crossing point. |
|
|
|
|
|
Step
3: Pass the working end around
the dowel from left to right, while
holding onto the loop. |
|
|
|
|
|
Step
4: Pass the working end
through the loop from below (under -
over).
Tighten the loop first, then pull the end
to tighten the portion that goes around
the dowel. |
|
|
|
|
|
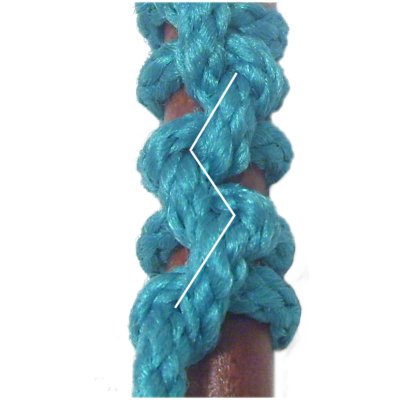
Step
5: Arrange the first loop
on a slight diagonal slant to the right
(white line and arrows).
Make a clockwise
loop with the working end, passing under
to form the crossing point. |
|
|
|
|
|
Step
6: Pass the working end
around the dowel, heading right to left,
and through the loop from below (under -
over).
Tighten the loop first, then the
remainder. Arrange the loop so it's
diagonal and slightly to the left. |
|
|

|
|
Step
7: Repeat
steps 2 - 6 at least twice, so
you can see the zigzag pattern for this
variation of the Cockscomb knot.
The white line in this image follows the
center of four loops, and shows how they
are supposed to be arranged. |
|
|
| |
| |
| |
|
|
| By using any
text or images on Free Macrame Patterns, you are
agreeing to our Terms of Use |
|
|
|
| Have
any comments about the Cockscomb Knot? Contact Me. |
|
|
|
|
|
|
|