|
|
| |
|
|
| |
| |
|
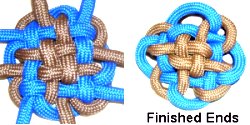
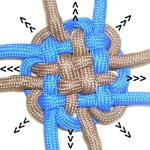
Description: The Celtic Weave
is a combination knot that has been seen in
Celtic artwork, but is not very well known.
The weaving in the center is surrounded by the
loops created by a Wall Knot.
There are 8 ends that can be used for other
knots, or they can be finished off.
A decorative knot like this can be used as a
focal point in many Macrame projects, including
handcrafted jewelry.
Knots like this can be used as a focal
knot with cords coming out in different
directions.
In the images, two colors were used to show the
details more clearly. The colors can be
arranged any way you wish.
Paracord was the material used, which needs to
have the tips melted with a flame to prepare the
cords for knotting.
|
| |
|
|
|
Wall Knot Base
|
| |
| |
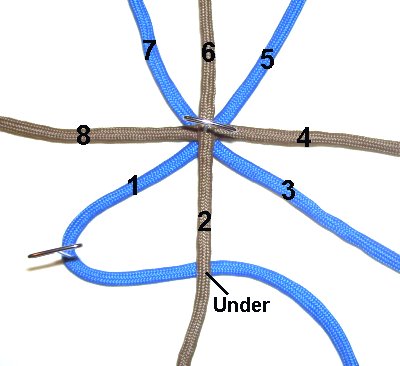
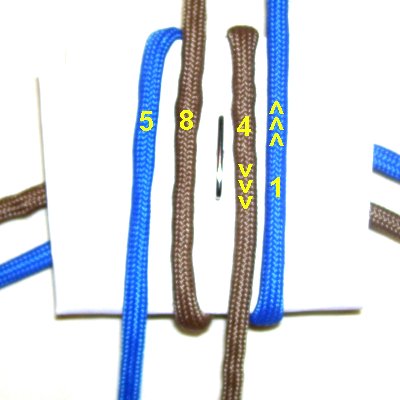
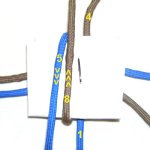
Preparation:
To practice, cut 4 cords, each at least 20 inches
long. Place the first two on your board
diagonally, forming a cross.
The other two cords should be arranged so one is
horizontal and the other vertical.
This gives you 8 ends to make the base, which
creates the loops along the outside
of the Celtic Weave.
In the instructions, they are described as if they
were separate cords.
Mentally number each cord 1 thru 8, in a counter-clockwise
direction, starting with the cord
on the lower
left.
|
| |
| |

|
|
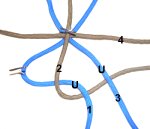
Step 1: Move cord
1 under
cord
2, curving it towards the right.
Secure cord
1 where it bends, so it is easy
to recognize.
|
|
| |
|
| |
|
|
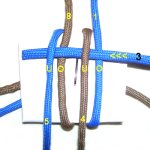
Step 2: Move cord
2 under
cords 1
and 3.
This cord passes under
the previous one moved (cord 1), as well
as the cord ahead (cord 3).
|
|
| |
|
|
|
|
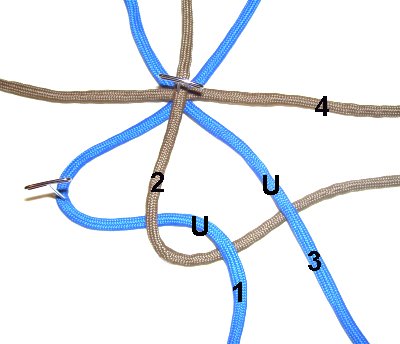
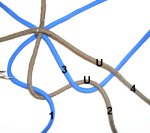
Step
3: Move cord
3 under
cords 2
and 4.
Continue on in this manner, until you
reach cord 8.
Be sure that each cord is moved under
the previous cord as well as the one
ahead.
|
|
|
| |

|
|
Step
4: Cord
8 should pass under
cord
7 and then through the space
formed by cord
1.
Be sure to pass the cord into the curved
area from below
(under).
|
|
| |
|
| |
|
|
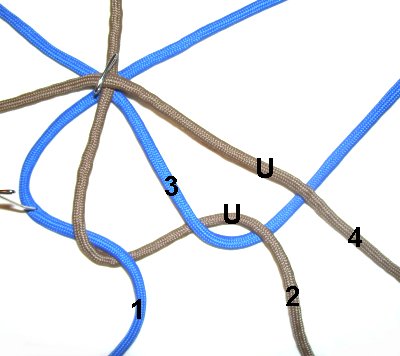
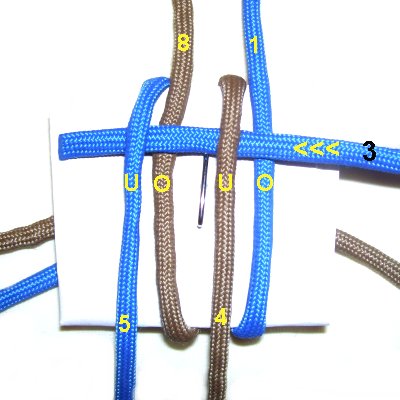
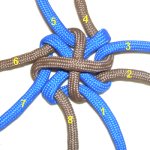
Step 5: Tighten the
base by pulling on the ends, one
at a time (slowly).
Don't tighten it all the way; leave some
space for the final steps.
Two cords need to come out in 4 areas,
mentally numbered as shown.
|
|
| |
|
| |
|
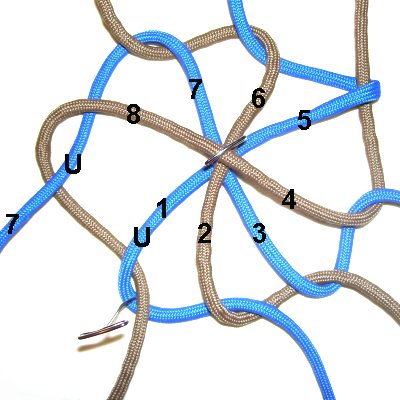
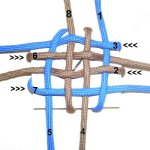
Step 6:
Place a piece of paper on top of the
base, and secure it in the center. This way the
weaving will be all you focus on when you create
the upper part of the Celtic Weave.
Each time you fold or weave a cord, secure
it. This way you know which ones you
have already moved.
|
| |
|
| |
|
<< Fold cord
5 over the paper, towards the bottom.
Fold cord
8 towards the top.
Fold cord
4 down to the bottom
and cord
1 up to the top.
>> |

|
|
|
|
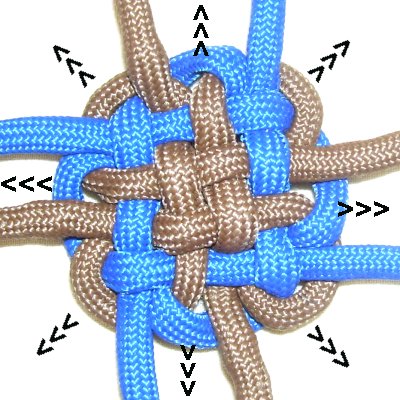
Step 7: The
cords on the left and right areas of the Celtic
Weave are used to create the horizontal
weaving.
Each cord passes through the vertical cords under - over
- under - over.
The
pattern does not change whether they are moving
left or right. |
|
| |
|
<<
Weave cord
3 right
to left.
Weave cord
6 left
to right. >>
Weave cord
2 right
to left. >>
Weave cord
7 left
to right. >>
|
|
|
| |
| |
|
|
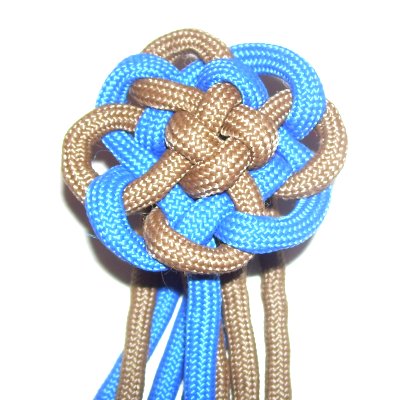
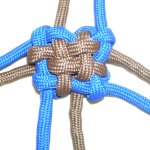
Step
8: Tighten the weaving
by pulling on all the ends, after removing
the paper and pin.
Try to keep the design square and as small
as possible. |
|
| |
|
|
Step
9: Pull each of the curved
areas in the base outward,
while holding the weaving firmly on your
board. Pressing down on the center
really helps.
The loops should surround the weaving,
forming a rounded square shape.
The ends can now be used as attachment
points for other cords. |
|
|
|
|

|
|
Another
finishing option is to tuck each end
through a loop which rests next to it.
Make sure
you pass it through a loop of the opposite
color.
This will bring all the ends to the back,
where they can be finished off. |
|
|
|
|
|
By
using any text or images on Free Macrame
Patterns, you are agreeing to our Terms
of Use
|
|
|
| |
|
Have
any comments about the Celtic Weave? Contact
Me.
|
|
|
|

|
|
| |
| |