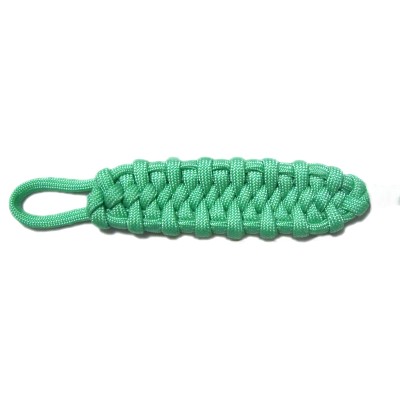
Click on the image or link to visit the
page. The knot gallery contains
videos for many unique decorative knots.
Preparation:
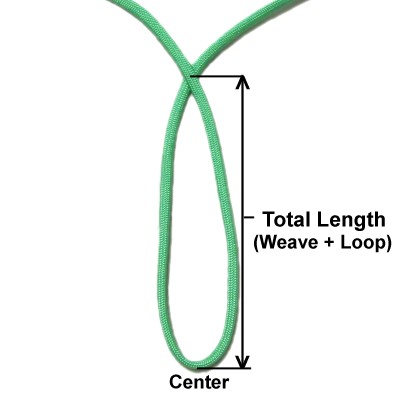
Write down the finished length you want to make
and add
at least 1/2-inch if you need a loop at
one end. The loop will become 1/2-inch
longer when the bar is tightened, so keep that in
mind when doing the math. Multiply that
total length by 12 (or more),
and cut one cord to that size.
Step 1: Fold the cord
in half and make a loop, crossing right
over left. Arrange it on your
board vertically, with the center fold
close to the front of your board.
This loop should be the total
length you got in preparation
(weave + loop). Adjust the size,
then secure the crossing point and the
fold.
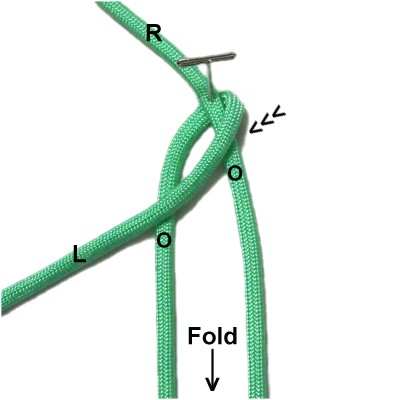
Step 2: Fold the left
half
of the cord diagonally toward the left,
passing over
both sides of the loop.
Fold the right
half diagonally to the right,
passing it under
the left side of the loop, over
the left half of the cord, and under
the right side of the loop.
Pull both halves to tighten this portion.
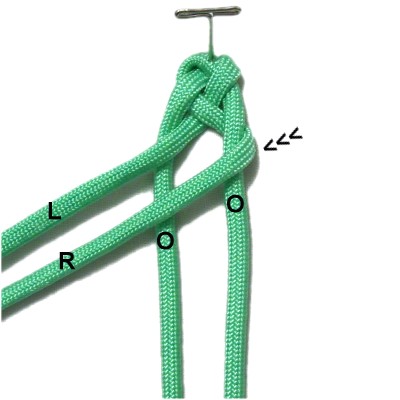
Step 3: Fold
the segment currently on the right
diagonally to the left, passing
over
both sides of the loop.
Fold the
segment currently on the left
diagonally to the right, passing
under
the left side of the loop.
Bring it over
the other half of the cord, and under
the right side of the loop.
Slide the
folded portions backward, closer to the
crossing point of the cord.
Eliminate any gaps as you tighten the
weave slightly, making sure the
area lies flat.
Step 4:Repeat
step 3 several times,
pushing the coils close together as you
progress.
When practicing, you should stop
1/2-inch from the fold. That will
give you a 1-inch loop.
See
more details below
Loop
Size: When you tighten the Bug
Belly Bar, the loop will be 1/2-inch longer than
where you stopped the weave.
So if you want a 3/4-inch loop, weave until you
are 1/4-inch from the center fold.
For a 2-inch loop, stop when you are 1-1/2 inches
from the fold.
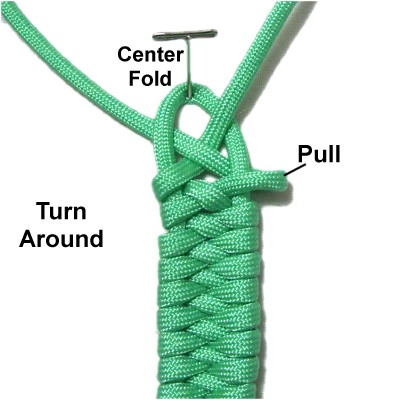
Step
5:Turn the bar so the
center fold (loop) is closer to the
back of the board.
On the left side, pull the first
segment to the right to make some
space.
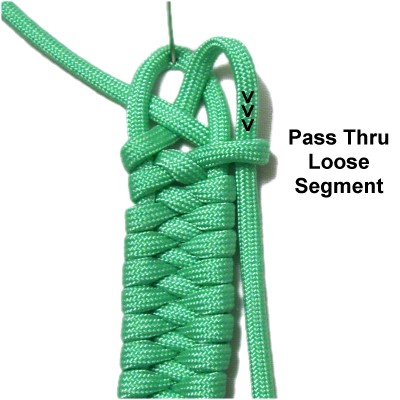
Step
6: Pass the working end
currently on the right
through the segment you pulled,
heading forward (toward you).
Re-tighten the pulled segment.
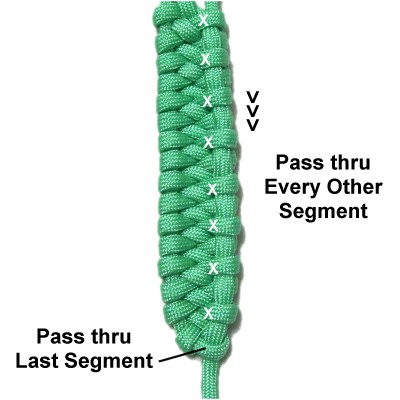
Step 7: Use fine tip
pliers or tweezers to loosen every
other segment, then pass the
right working end through them (heading
forward).
Include the last segment at the bottom.
Step
8: The left working end is
currently under the loop.
Pull it out so you can move it more easily
through the segments on the left side.
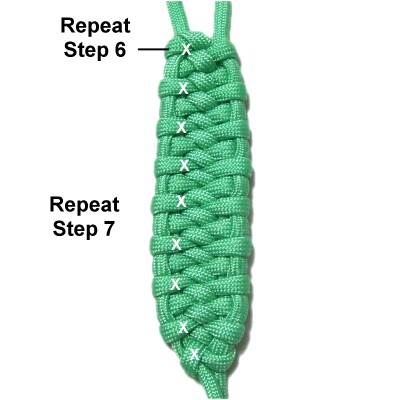
Step
9:Repeat
steps 6 and 7, passing the left
working end through every other segment on
the leftside
of the bar.
The Bug Belly Bar should look the same on
both sides.
Move the
working ends to the sides
of the bar so they aren't as noticeable.
Pull the loop
(center fold) firmly
to tighten the entire bar.
Finish off the ends in the manner most
appropriate for your project.
By
using any text or images on Free Macrame
Patterns, you are agreeing to ourTerms
of Use