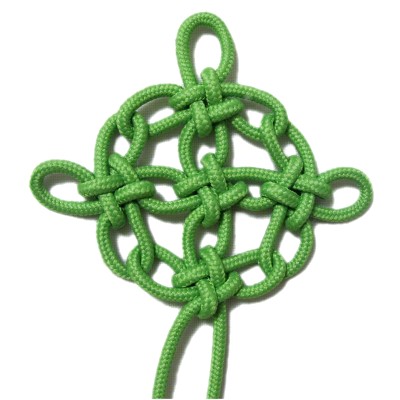
Description:
The Brocade Ball Knot features five Cloverleaf
knots linked together to form a circular design.
The most challenging part to making this
interesting design is tightening. The loops
need to be large enough so the knots can be turned
sideways and still lie flat.
It's important that you use material that is NOT
slippery, because the knots will loosen over time.
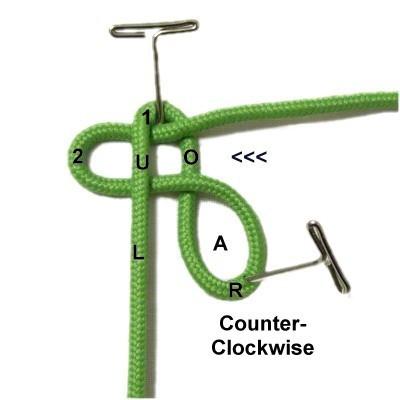
Here is the key
to the images and instructions:
BIGHTS = Folded segments (labeled 1 - 3)
LOOPS = Circular with crossing point
(labeled A - C)
ARROWS = Show direction and angle
First Cloverleaf Knot
Step
1: You need one cord at
least 60 inches long to make the Brocade
Ball Knot. Use a 72-inch cord if the
material is wider than 3mm.
Fold the cord in half and mentally label
it as bight
1.
Use the right half
of the cord to make loop
A in a counter-clockwise
direction.
Then fold the cord to make bight
2.
Pass it into bight 1 over
- under, heading left
horizontally.
Use the right half
of the cord to make loop
B in a counter-clockwise
direction.
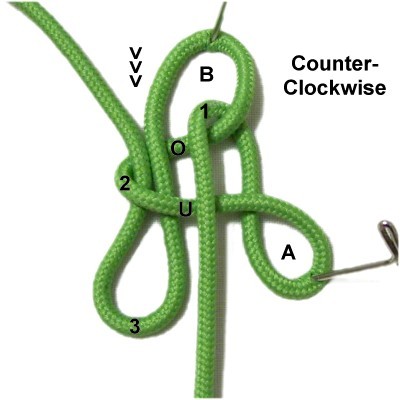
Fold it to make bight
3.
Pass it into bight 2 over
- under, heading forward
vertically.
Make loop
C in a counter-clockwise
direction.
Pass the right
half through bight
3over
- under, heading right. Then pass
it under
the left half of the cord.
Bring it through loop
Aunder
- over (from below).
Move the right half
of the cord to the left, passing it over
the left side of loop
A and over
the left half of the cord.
Bring it through bight
3under
- over.
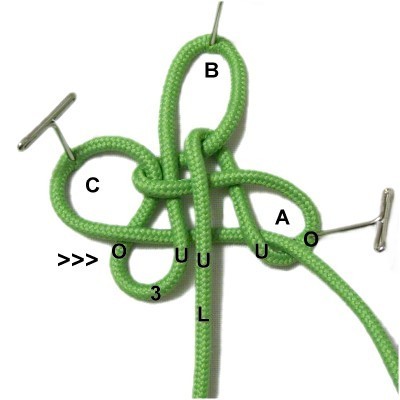
Step 1,
continued: Tighten the first
Cloverleaf for the Brocade Ball Knot gradually,
by first pulling on the LOOPS to tighten the
bights in the center.
Next, reduce the size of the loops. I
recommend you start with loop
B and pull the slack out heading toward
the other loops(both
directions).
Important:
Adjust the cord as you work so both halves are the
same length
when you are done.
The three loops should be at least 1/2-inch
in size if you are using 2mm - 3mm size cord
material. Increase the size of the
loops if using 4mm material.
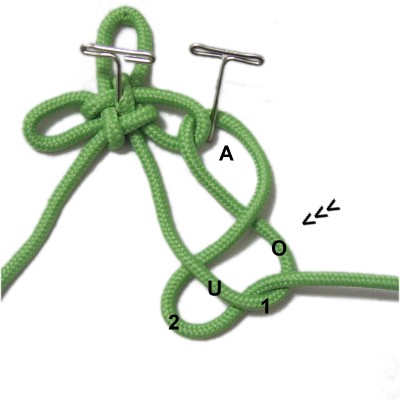
Brocade Ball Knot - Cloverleaf #2
The second Cloverleaf
for the Brocade Ball Knot is made in a different
direction than the first knot. The first
loop is on the upper right and the third is on the
lower left.
Step
2: Make bight
1 with the left
half of the cord, arranged
diagonally.
It should be at least 1.5 inches long.
Pass it through loop
1 (right) of the first Cloverleaf
knot over
- under, heading right.
Rotate the
left half clockwise
to form loop
A.
Fold it to make bight
2.
Pass it into bight 1 over
- under moving right to left. It
should rest near the fold of bight 1.
Rotate the left
half clockwise
to form loop B.
Fold it to make bight
3.
Pass it into bight 2 over
- under.
Make loop
C in a clockwise direction.
Pass the left half through bight
3over
- under.
Bring it under
the segment coming from the previous knot
(bight 1) and through loop
Aunder
- over.
Move the left
half back to the left, passing it over
the left side of loop
A, and over
the segment coming from the previous knot.
Pass it through bight
3under
- over.
Tighten the
second Cloverleaf for the Brocade Ball
Knot, turning it to the right of the first
knot.
Adjust the segment between the two knots
so it's at least 1-inch long. It
will be used as a bight for the fourth
knot.
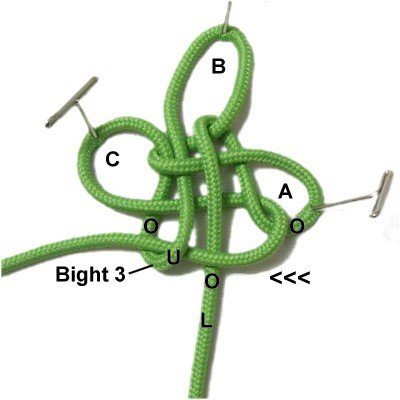
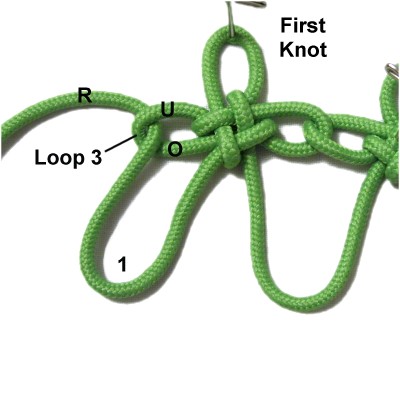
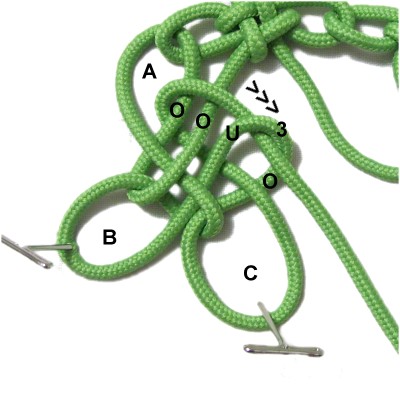
Brocade Ball Knot - Cloverleaf #3
The third Cloverleaf for the Brocade Ball Knot
is made in the reverse order of the second knot,
and you use the right half of the cord.
The first loop is on the upper left and the third
is on the lower right.
Step
3: Fold the right
half to make bight
1.
Pass it through loop
3 of the first Cloverleaf Knot
(left) over
- under.
Make loop
A in a counter-clockwise
direction.
Fold the cord to make bight
2.
Pass it into bight 1 from left to right over
- under.
Make loop
B (counter-clockwise), then fold
the cord to make bight
3.
Pass it into bight 2 over
- under.
Make loop
C counter-clockwise,
then pass the right half of the cord
through bight
3over
- under.
Bring it under
the segment coming from the first knot,
then through loop
Aunder
- over.
Move the right
half of the cord over
the right side of loop
A, then over
the segment coming from the first knot.
Pass it through bight
3under
- over.
Tighten the Cloverleaf and position it to
the left of the other two knots.
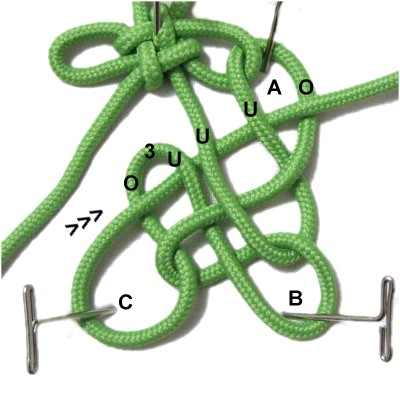
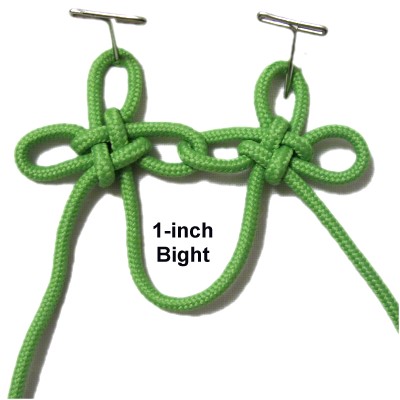
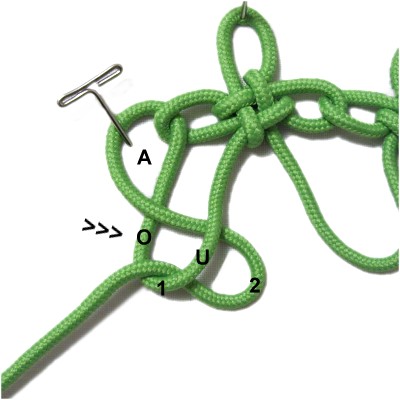
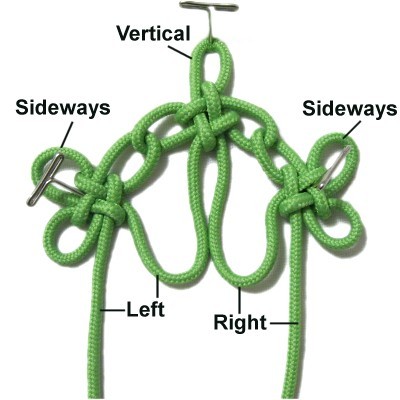
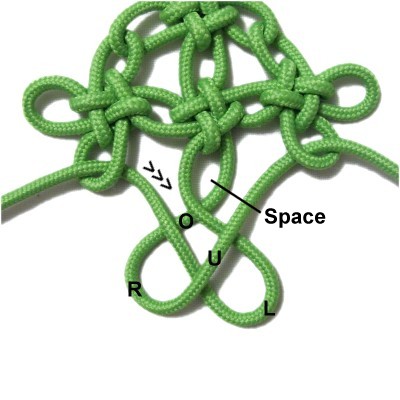
Brocade Ball Knot - Cloverleaf #4
The fourth Cloverleaf for the Brocade Ball Knot
is made from the two folded segments between
the three knots (bights).
Step
4: Mentally re-label both
halves of the cord where they rest
now. Label the bights left and
right, too.
Turn the second
and third
Cloverleaf knots sideways. The first knot
should remain vertical.
Pass the left
bight into the right one over
- under, heading left to right.
Turn the left bight to the left, so it's
almost vertical (see next image).
Make sure there is a space next to the
tightened area of the first knot.
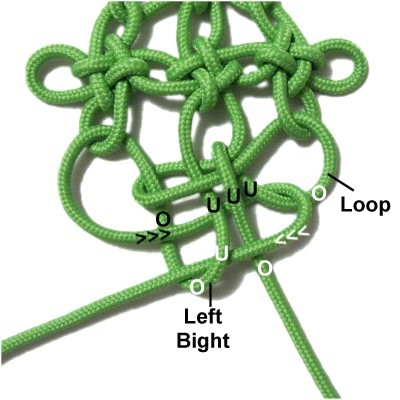
Black path:
Curve the right
half of the cord, then pass it under
both segments of the right
bight heading
backward.
White
path: Bring it out through the space
(forward), passing over
the same two segments.
Pass the left half
of the cord over
- under the left
bight, heading right.
Move it under
the right half of the cord, then pass it under
- over the curved area next to
it.
Move the left half
of the cord back to the left, over
the curved area and over
the right half of the cord.
Pass it through the left
bightunder
- over.
Tighten the
fourth Cloverleaf for the Brocade Ball
Knot gradually.
You will need to pull the other knots to
do this, so be careful not to distort
them.
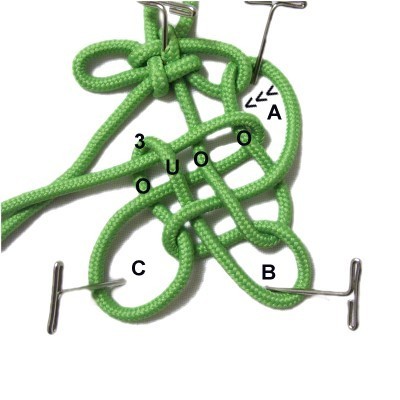
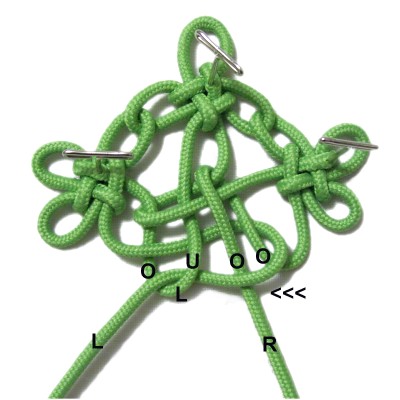
Continued
Below
Step 4,
continued: This is the best place
to make adjustments if the four knots for the
Brocade Ball Knot are too far apart. Follow the
arrows on the image above and use these
instructions to make adjustments:
Remove the slack from the area next to knot 1
first, pulling towards knot
4.
Continue by removing the slack from knot 4
to knot 3. Then work the other
direction, from knot 4 to knot 2. You
will need to work it out all the way through
both knots.
Pull out the remaining slack toward loop 4,
then all the way through it to the ends.
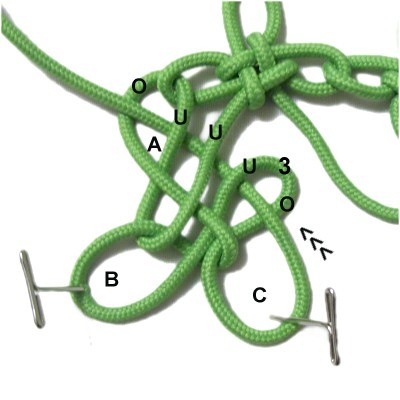
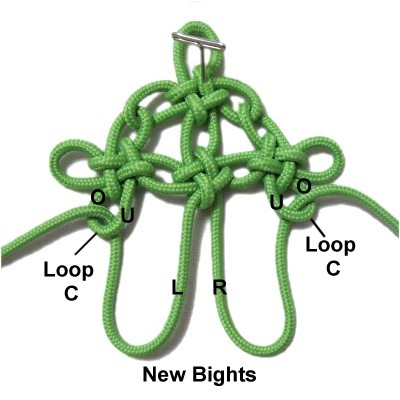
Brocade Ball Knot - Cloverleaf #5
The fifth Cloverleaf for the Brocade Ball Knot
is similar to the fourth, but you link it to the
loops from the second and third knot.
Step
5: Fold each half of the
cord to make two bights. They should
be at least 1.5 inches long.
On each side, pass the cord through loop
C of the second
and third
Cloverleaf knots(closest to you).
Make sure you pass the cord through under -
over(from below).
Pass theleft
bight into the right
bight over
- under, heading right.
Make sure there is a space close to the
4th Cloverleaf knot.
Black
path: Curve the right
half of the cord clockwise
to make a loop,
then pass it under
both segments of the right
bight, pulling it out through the
space.
White
path: Move it toward you, passing
over
the bight.
Black
path: Move the left
half of the cord to the right, over
- under the left
bight, under
the right half of the cord, and through
the loop under
- over.
White
path: Pass it over
the right half of the cord heading left,
and through the left bight under
- over.
Tighten the
fifth Cloverleaf for the Brocade Ball
Knot.
Then check the other areas and re-tighten
if needed.
By
using any text or images on Free Macrame
Patterns, you are agreeing to ourTerms
of Use